Quantcast
Channel: Severalnines - MaxScale

How to Replace an Intermediate MySQL or MariaDB Master with a Binlog Server using MaxScale

$
0
0

Binary logs (binlogs) contain records of all changes to the databases. They are necessary for replication and can also be used to restore data after a backup. A binlog server is basically a binary log repository. You can think of it like a server with a dedicated purpose to retrieve binary logs from a master, while slave servers can connect to it like they would connect to a master server.

Some advantages of having a binlog server over intermediate master to distribute replication workload are:

  • You can switch to a new master server without the slaves noticing that the actual master server has changed. This allows for a more highly available replication setup where replication is high-priority.
  • Reduce the load on the master by only serving Maxscale’s binlog server instead of all the slaves.
  • The data in the binary log of the intermediate master is not a direct copy of the data that was received from the binary log of the real master. As such, if group commit is used, this can cause a reduction in the parallelism of the commits and a subsequent reduction in the performance of the slave servers.
  • Intermediate slave has to re-execute every SQL statement which potentially adds latency and lags into the replication chain.

In this blog post, we are going to look into how to replace an intermediate master (a slave host relay to other slaves in a replication chain) with a binlog server running on MaxScale for better scalability and performance.

Architecture

We basically have a 4-node MariaDB v10.4 replication setup with one MaxScale v2.3 sitting on top of the replication to distribute incoming queries. Only one slave is connected to a master (intermediate master) and the other slaves replicate from the intermediate master to serve read workloads, as illustrated in the following diagram.

We are going to turn the above topology into this:

Basically, we are going to remove the intermediate master role and replace it with a binlog server running on MaxScale. The intermediate master will be converted to a standard slave, just like other slave hosts. The binlog service will be listening on port 5306 on the MaxScale host. This is the port that all slaves will be connecting to for replication later on.

Configuring MaxScale as a Binlog Server

In this example, we already have a MaxScale sitting on top of our replication cluster acting as a load balancer for our applications. If you don't have a MaxScale, you can use ClusterControl to deploy simply go to Cluster Actions -> Add Load Balancer -> MaxScale and fill up the necessary information as the following:

Before we get started, let's export the current MaxScale configuration into a text file for backup. MaxScale has a flag called --export-config for this purpose but it must be executed as maxscale user. Thus, the command to export is:

$ su -s /bin/bash -c '/bin/maxscale --export-config=/tmp/maxscale.cnf' maxscale

On the MariaDB master, create a replication slave user called 'maxscale_slave' to be used by the MaxScale and assign it with the following privileges:

$ mysql -uroot -p -h192.168.0.91 -P3306
MariaDB> CREATE USER 'maxscale_slave'@'%' IDENTIFIED BY 'BtF2d2Kc8H';
MariaDB> GRANT SELECT ON mysql.user TO 'maxscale_slave'@'%';
MariaDB> GRANT SELECT ON mysql.db TO 'maxscale_slave'@'%';
MariaDB> GRANT SELECT ON mysql.tables_priv TO 'maxscale_slave'@'%';
MariaDB> GRANT SELECT ON mysql.roles_mapping TO 'maxscale_slave'@'%';
MariaDB> GRANT SHOW DATABASES ON *.* TO 'maxscale_slave'@'%';
MariaDB> GRANT REPLICATION SLAVE ON *.* TO 'maxscale_slave'@'%';

For ClusterControl users, go to Manage -> Schemas and Users to create the necessary privileges.

Before we move further with the configuration, it's important to review the current state and topology of our backend servers:

$ maxctrl list servers
┌────────┬──────────────┬──────┬─────────────┬──────────────────────────────┬───────────┐
│ Server │ Address      │ Port │ Connections │ State                        │ GTID      │
├────────┼──────────────┼──────┼─────────────┼──────────────────────────────┼───────────┤
│ DB_757 │ 192.168.0.90 │ 3306 │ 0           │ Master, Running              │ 0-38001-8 │
├────────┼──────────────┼──────┼─────────────┼──────────────────────────────┼───────────┤
│ DB_758 │ 192.168.0.91 │ 3306 │ 0           │ Relay Master, Slave, Running │ 0-38001-8 │
├────────┼──────────────┼──────┼─────────────┼──────────────────────────────┼───────────┤
│ DB_759 │ 192.168.0.92 │ 3306 │ 0           │ Slave, Running               │ 0-38001-8 │
├────────┼──────────────┼──────┼─────────────┼──────────────────────────────┼───────────┤
│ DB_760 │ 192.168.0.93 │ 3306 │ 0           │ Slave, Running               │ 0-38001-8 │
└────────┴──────────────┴──────┴─────────────┴──────────────────────────────┴───────────┘

As we can see, the current master is DB_757 (192.168.0.90). Take note of this information as we are going to setup the binlog server to replicate from this master.

Open the MaxScale configuration file at /etc/maxscale.cnf and add the following lines:

[replication-service]
type=service
router=binlogrouter
user=maxscale_slave
password=BtF2d2Kc8H
version_string=10.4.12-MariaDB-log
server_id=9999
master_id=9999
mariadb10_master_gtid=true
filestem=binlog
binlogdir=/var/lib/maxscale/binlogs
semisync=true # if semisync is enabled on the master

[binlog-server-listener]
type=listener
service=replication-service
protocol=MariaDBClient
port=5306
address=0.0.0.0

A bit of explanation - We are creating two components - service and listener. Service is where we define the binlog server characteristic and how it should run. Details on every option can be found here. In this example, our replication servers are running with semi-sync replication, thus we have to use semisync=true so it will connect to the master via semi-sync replication method. The listener is where we map the listening port with the binlogrouter service inside MaxScale.

Restart MaxScale to load the changes:

$ systemctl restart maxscale

Verify the binlog service is started via maxctrl (look at the State column):

$ maxctrl show service replication-service

Verify that MaxScale is now listening to a new port for the binlog service:

$ netstat -tulpn | grep maxscale
tcp        0 0 0.0.0.0:3306            0.0.0.0:* LISTEN   4850/maxscale
tcp        0 0 0.0.0.0:3307            0.0.0.0:* LISTEN   4850/maxscale
tcp        0 0 0.0.0.0:5306            0.0.0.0:* LISTEN   4850/maxscale
tcp        0 0 127.0.0.1:8989          0.0.0.0:* LISTEN   4850/maxscale

We are now ready to establish a replication link between MaxScale and the master.

Activating the Binlog Server

Log into the MariaDB master server and retrieve the current binlog file and position:

MariaDB> SHOW MASTER STATUS;
+---------------+----------+--------------+------------------+
| File          | Position | Binlog_Do_DB | Binlog_Ignore_DB |
+---------------+----------+--------------+------------------+
| binlog.000005 |     4204 |              |                  |
+---------------+----------+--------------+------------------+

Use BINLOG_GTID_POS function to get the GTID value:

MariaDB> SELECT BINLOG_GTID_POS("binlog.000005", 4204);
+----------------------------------------+
| BINLOG_GTID_POS("binlog.000005", 4204) |
+----------------------------------------+
| 0-38001-31                             |
+----------------------------------------+

Back to the MaxScale server, install MariaDB client package:

$ yum install -y mysql-client

Connect to the binlog server listener on port 5306 as maxscale_slave user and establish a replication link to the designated master. Use the GTID value retrieved from the master:

(maxscale)$ mysql -u maxscale_slave -p'BtF2d2Kc8H' -h127.0.0.1 -P5306
MariaDB> SET @@global.gtid_slave_pos = '0-38001-31';
MariaDB> CHANGE MASTER TO MASTER_HOST = '192.168.0.90', MASTER_USER = 'maxscale_slave', MASTER_PASSWORD = 'BtF2d2Kc8H', MASTER_PORT=3306, MASTER_USE_GTID = slave_pos;
MariaDB> START SLAVE;
MariaDB [(none)]> SHOW SLAVE STATUS\G
*************************** 1. row ***************************
                 Slave_IO_State: Binlog Dump
                  Master_Host: 192.168.0.90
                  Master_User: maxscale_slave
                  Master_Port: 3306
             Slave_IO_Running: Yes
            Slave_SQL_Running: Yes
             Master_Server_Id: 38001
             Master_Info_File: /var/lib/maxscale/binlogs/master.ini
      Slave_SQL_Running_State: Slave running
                  Gtid_IO_Pos: 0-38001-31

Note: The above output has been truncated to show only important lines.

Pointing Slaves to the Binlog Server

Now on mariadb2 and mariadb3 (the end slaves), change the master pointing to the MaxScale binlog server. Since we are running with semi-sync replication enabled, we have to turn them off first:

(mariadb2 & mariadb3)$ mysql -uroot -p
MariaDB> STOP SLAVE;
MariaDB> SET global rpl_semi_sync_master_enabled = 0; -- if semisync is enabled
MariaDB> SET global rpl_semi_sync_slave_enabled = 0; -- if semisync is enabled
MariaDB> CHANGE MASTER TO MASTER_HOST = '192.168.0.95', MASTER_USER = 'maxscale_slave', MASTER_PASSWORD = 'BtF2d2Kc8H', MASTER_PORT=5306, MASTER_USE_GTID = slave_pos;
MariaDB> START SLAVE;
MariaDB> SHOW SLAVE STATUS\G
*************************** 1. row ***************************
                Slave_IO_State: Waiting for master to send event
                   Master_Host: 192.168.0.95
                   Master_User: maxscale_slave
                   Master_Port: 5306
              Slave_IO_Running: Yes
             Slave_SQL_Running: Yes
              Master_Server_Id: 9999
                    Using_Gtid: Slave_Pos
                   Gtid_IO_Pos: 0-38001-32
       Slave_SQL_Running_State: Slave has read all relay log; waiting for the slave I/O thread to update it

Note: The above output has been truncated to show only important lines.

Inside my.cnf, we have to comment the following lines to disable semi-sync in the future:

#loose_rpl_semi_sync_slave_enabled=ON
#loose_rpl_semi_sync_master_enabled=ON

At this point, the intermediate master (mariadb1) is still replicating from the master (mariadb0) while other slaves have been replicating from the binlog server. Our current topology can be illustrated like the diagram below:

The final part is to change the master pointing of the intermediate master (mariadb1) after all slaves that used to attach to it are no longer there. The steps are basically the same with the other slaves:

(mariadb1)$ mysql -uroot -p
MariaDB> STOP SLAVE;
MariaDB> SET global rpl_semi_sync_master_enabled = 0; -- if semisync is enabled
MariaDB> SET global rpl_semi_sync_slave_enabled = 0; -- if semisync is enabled
MariaDB> CHANGE MASTER TO MASTER_HOST = '192.168.0.95', MASTER_USER = 'maxscale_slave', MASTER_PASSWORD = 'BtF2d2Kc8H', MASTER_PORT=5306, MASTER_USE_GTID = slave_pos;
MariaDB> START SLAVE;
MariaDB> SHOW SLAVE STATUS\G
*************************** 1. row ***************************
                Slave_IO_State: Waiting for master to send event
                   Master_Host: 192.168.0.95
                   Master_User: maxscale_slave
                   Master_Port: 5306
              Slave_IO_Running: Yes
             Slave_SQL_Running: Yes
              Master_Server_Id: 9999
                    Using_Gtid: Slave_Pos
                   Gtid_IO_Pos: 0-38001-32

Note: The above output has been truncated to show only important lines.

Don't forget to disable semi-sync replication in my.cnf as well:

#loose_rpl_semi_sync_slave_enabled=ON
#loose_rpl_semi_sync_master_enabled=ON

We can the verify the binlog router service has more connections now via maxctrl CLI:

$ maxctrl list services
┌─────────────────────┬────────────────┬─────────────┬───────────────────┬───────────────────────────────────┐
│ Service             │ Router         │ Connections │ Total Connections │ Servers                           │
├─────────────────────┼────────────────┼─────────────┼───────────────────┼───────────────────────────────────┤
│ rw-service          │ readwritesplit │ 1           │ 1                 │ DB_757, DB_758, DB_759, DB_760    │
├─────────────────────┼────────────────┼─────────────┼───────────────────┼───────────────────────────────────┤
│ rr-service          │ readconnroute  │ 1           │ 1                 │ DB_757, DB_758, DB_759, DB_760    │
├─────────────────────┼────────────────┼─────────────┼───────────────────┼───────────────────────────────────┤
│ replication-service │ binlogrouter   │ 4           │ 51                │ binlog_router_master_host, DB_757 │
└─────────────────────┴────────────────┴─────────────┴───────────────────┴───────────────────────────────────┘

Also, common replication administration commands can be used inside the MaxScale binlog server, for example, we can verify the connected slave hosts by using this command:

(maxscale)$ mysql -u maxscale_slave -p'BtF2d2Kc8H' -h127.0.0.1 -P5306
MariaDB> SHOW SLAVE HOSTS;
+-----------+--------------+------+-----------+------------+
| Server_id | Host         | Port | Master_id | Slave_UUID |
+-----------+--------------+------+-----------+------------+
| 38003     | 192.168.0.92 | 3306 | 9999      |            |
| 38002     | 192.168.0.91 | 3306 | 9999      |            |
| 38004     | 192.168.0.93 | 3306 | 9999      |            |
+-----------+--------------+------+-----------+------------+

At this point, our topology is looking as what we anticipated:

Our migration from intermediate master setup to binlog server setup is now complete.


Database Load Balancing in a Multi-Cloud Environment

$
0
0

Multi-cloud environments are a very good solution to implement disaster recovery and very high level of high availability. They help to ensure that even a full outage of a whole region of one cloud provider will not impact your operations because you can easily switch your workload to another cloud. 

Utilizing multi-cloud setups also allows you to avoid vendor lock-in, as you are building your environment using common building blocks that can be reused in every environment (cloud or on-prem) and not something strictly tied to the particular cloud provider.

Load Balancers are one of the building blocks for any highly available environment, database clusters are no different. Designing load balancing in a multi-cloud environment might be tricky, in this blog post we will try to share some suggestions about how to do that.

Designing a Load Balancing Tier for Multi-Cloud Database Clusters

For starters, what’s important to keep in mind is that there will be differences in how you want to design your load balancer based on the type of the database cluster. We will discuss two major types: clusters with one writer and clusters with multiple writers. 

Clusters with one writer are, typically, replication clusters where, by design, you have only one writable node, the master. We can also put here multi-writer clusters when we want to use just one writer at the same time. Clusters with multiple writers are multi-master setups like Galera Cluster for MySQL, MySQL Group Replication or Postgres-BDR. The database type may make some small differences but they are not as significant as the type of the cluster, thus we’ll stick to the more generic approach and try to keep the broader picture.

The most important thing we have to keep in mind while designing the load balancing tier is its high availability. This may be especially tricky for the multi-cloud clusters. We should ensure that the loss of the connectivity between the cloud providers will be handled properly.

Multi-Cloud Load Balancing - Multi-Writer Clusters

Let’s start with multi-writer clusters. The fact that we have multiple writers makes it easier for us to design load balancers. Write conflicts are typically handled by the database itself therefore, from the load balancing standpoint, all we need to do is fire and forget - send the traffic to one of the available nodes and that’s pretty much it. What’s also great about multi-writer clusters is that they, typically, are quorum-based and any kind of a network partitioning should be handled pretty much automatically. Thanks to that we don’t have to be worried about split brain scenarios - that makes our lives really easy.

What we have to focus on is the high availability of the load balancers. We can achieve that by leveraging highly available load balancing options. Again, we’ll try to keep this blog post generic but we are talking here about tools like Elastic Load Balancing in AWS or Cloud Load Balancing in GCP. Those products are designed to be highly available and scalable and while they are not designed to work with databases, we can quite easily use them to provide load balancing in front of our loadbalancer tier. What’s needed is a couple of scripts to ensure that cloud load balancers will be able to run health checks against database load balancers of our choosing. An example setup may look like this:

Multi-Cloud Database Load Balancing - Multi-Writer Clusters

What we see here is an environment that consists of three clouds (it can be multiple regions from the same cloud provider, multiple cloud providers for multi-cloud environment or even hybrid cloud that connects multiple cloud providers and on-prem data centers. Each environment is built in a similar way. There are application hosts that connect to the first layer of the load balancers. As we mentioned earlier, those have to be highly available load balancers like those provided by GCP or AWS. For on-prem this can be delivered by one of Virtual IP-based solutions like Keepalived. Traffic then is sent to the dedicated database load balancing tier - ProxySQL, MySQL Router, MaxScale, pgbouncer, HAProxy or similar. That tier is tracking the state of the databases colocated in the same segment and sends the traffic towards them.

Multi-Cloud Load Balancing - Single Writer Setups

This kind of setup is definitely more complex to design given that we have to keep in mind that we can have only one writer in the mix. Main challenge would be to be able to consistently keep track of the writer, ensuring that all of the load balancers will send the writes to the correct destination. There are several ways of doing this and we’ll give you some examples. For starters good old DNS. DNS can be used to store the hostname that is pointing to the writer. Load Balancers then can be configured to send their writes to, for example, writer.databases.mywebsite.com. Then it will be up to the failover automation to ensure that the ‘writer.databases.mywebsite.com’ will be updated after the failover and that it points towards the correct database node. This has pros and cons, as you may expect. DNS is not really designed with low latency in mind therefore changing the records comes with a delay. TTL can be reduced, sure, but will never be real-time.

Another option is to use service discovery tools. Solutions like etc.d or Consul can be used to store information about the infrastructure and, among others, information which node performs the role of the writer. This information can be utilized by load balancers, helping them to point write traffic to the correct destination. Some of the service discovery tools can expose infrastructure information as DNS records, which allows you to combine both solutions if you feel that’s needed.

Let’s take a look at an example of an environment where we have a single writer in one of the cloud providers.

Multi-Cloud Database Load Balancing - Single Writer Setups

What we have here are three data centers, cloud providers or regions. In one of them we have a writer and all of the writes coming from all load balancers in all cloud providers will be directed to that writer node. Reads are being distributed across other database nodes in the same location. The Consul cluster has been deployed across the whole infrastructure, storing the information about the writer node. Consul cluster can, eventually, be also used to reduce the risk that comes with a split-brain. Scripts can be prepared to track the state of Consul nodes and, should the node lost connectivity with the rest of the Consul cluster, it may assume that the network partitioning has happened and take some actions as needed (or, even more importantly, do not take some actions like promoting new writer). Should the writer fail, an automated failover solution should check the state of the Consul node to make sure that network is working properly. If yes, a new writer should be promoted among all the nodes. Up to you is to decide if it is feasible to failover to nodes from multiple clouds or would you prefer to promote one of the nodes colocated with the failed writer. Once failover is completed, the Consul should be updated with information about the new location to send writes to. Load Balancers will pick it up and the regular flow of traffic will be restored.

Conclusion

As you can see, designing a proper load balancing solution for databases in a multi-cloud environment, even if not trivial, it is definitely possible. This blog post should give you an overview of the challenges you will face and solutions to them. We hope it will make your job in implementing such a setup way easier.


Introduction to MaxScale Administration Using maxctrl for MariaDB Cluster

$
0
0

MariaDB Cluster consists of MariaDB Server with Galera Cluster and MariaDB MaxScale. As a multi-master replication solution, any MariaDB Server with Galera Cluster can operate as a primary server. This means that changes made to any node in the cluster replicate to every other node in the cluster, using certification-based replication and global ordering of transactions for the InnoDB storage engine. MariaDB MaxScale is a database proxy, sitting on top of the MariaDB Server that extends the high availability, scalability, and security while at the same time simplifying application development by decoupling it from the underlying database infrastructure. 

In this blog series, we are going to look at the MaxScale administration using maxctrl for our MariaDB Cluster. In this first installment of the blog series, we are going to cover the introduction and some basics of maxctrl command-line utility. Our setup consists of one MaxScale server and a 3-node MariaDB 10.4 with Galera 4, as illustrated in the following diagram:

Maxscale ClusterControl Diagram

Our MariaDB Cluster was deployed and managed by ClusterControl, while our MaxScale host is a new host in the cluster and was not deployed by ClusterControl for the purpose of this walkthrough.

MaxScale Installation

The MaxScale installation is pretty straightforward. Choose the right operating system from the MariaDB download page for MaxScale and download it. The following example shows how one would install MaxScale on a CentOS 8 host:

$ wget https://dlm.mariadb.com/1067156/MaxScale/2.4.10/centos/8/x86_64/maxscale-2.4.10-1.centos.8.x86_64.rpm
$ yum localinstall maxscale-2.4.10-1.centos.8.x86_64.rpm
$ systemctl enable maxscale
$ systemctl start maxscale

After the daemon is started, by default, MaxScale components will be running on the following ports:

  • 0.0.0.0:4006 - Default read-write splitting listener.
  • 0.0.0.0:4008 - Default round-robin listener.
  • 127.0.0.1:8989 - MaxScale Rest API.

The above ports are changeable. It is common for a standalone MaxScale server in production to be running with the read/write split on port 3306 and round-robin on port 3307. This configuration is what we are going to deploy in this blog post.

Important Files and Directory Structure

Once the package is installed, you will get the following utilities/programs:

  • maxscale - The MaxScale itself. 
  • maxctrl - The command-line administrative client for MaxScale which uses the MaxScale REST API for communication.
  • maxadmin - The deprecated MaxScale administrative and monitor client. Use maxctrl instead.
  • maxkeys - This utility writes into the file .secrets, in the specified directory, the AES encryption key and init vector that is used by the utility maxpasswd, when encrypting passwords used in the MariaDB MaxScale configuration file.
  • maxpasswd - This utility creates an encrypted password using a .secrets file that has earlier been created using maxkeys.

MaxScale will load all the configuration options from the following locations, in the particular order:

  1. /etc/maxscale.cnf
  2. /etc/maxscale.cnf.d/*.cnf
  3. /var/lib/maxscale/maxscale.cnf.d/*.cnf

To understand further on MaxScale configuration, check out the MaxScale Configuration Guide.

Once MaxScale is initialized, the default files and directory structures are:

  • MaxScale data directory: /var/lib/maxscale
  • MaxScale PID file: /var/run/maxscale/maxscale.pid
  • MaxScale log file: /var/log/maxscale/maxscale.log
  • MaxScale documentation: /usr/share/maxscale

MaxCtrl - The CLI

Once started, we can use the MaxCtrl command-line client to administer the MaxScale by using the MaxScale REST API listens on port 8989 on the localhost. The default credentials for the REST API are "admin:mariadb". The users used by the REST API are the same that are used by the MaxAdmin network interface. This means that any users created for the MaxAdmin network interface should work with the MaxScale REST API and MaxCtrl.

We can use the maxctrl utility in interactive mode, similar to the mysql client. Just type "maxctrl" and you will get into the interactive mode (where the prompt changed from the shell prompt to maxctrl prompt), just like the following screenshot:

MariaDB Maxscale CLI maxctrl

Alternatively, we can execute the very same command directly in the shell prompt, for example:

MariaDB Maxscale CLI maxctrl

MaxCtrl command options are depending on the MaxScale version that comes with it. At the time of this writing, the MaxScale version is 2.4 and you should look into this documentation for a complete list of commands. MaxCtrl utilizes the MaxScale REST API interface, which explains in detail here.

Adding MariaDB Servers into MaxScale

When we first start our MaxScale, it will generate a configuration file at /etc/maxscale.cnf with some default parameters and examples. We are not going to use this configuration and we are going to create our own instead. Create a backup of this file because we want to empty it later on:

$ mv /etc/maxscale.cnf /etc/maxscale.cnf.bak
$ cat /dev/null > /etc/maxscale.cnf # empty the file

Restart the MaxScale to start everything fresh:

$ systemctl restart maxscale

The term "server" in MaxScale basically means the backend MariaDB server, as in this case, all 3 nodes of our MariaDB Cluster. To add all the 3 MariaDB Cluster servers into MaxScale runtime, use the following commands:

$ maxctrl create server mariadbgalera1 192.168.0.221 3306
$ maxctrl create server mariadbgalera2 192.168.0.222 3306
$ maxctrl create server mariadbgalera3 192.168.0.222 3306

To verify the added servers, use the list command:

$ maxctrl list servers

And you should see the following output:

Adding Monitoring into MaxScale

The next thing is to configure the monitoring service for MaxScale usage. MaxScale supports a number of monitoring modules depending on the database type, namely:

  • MariaDB Monitor
  • Galera Monitor
  • Clustrix Monitor
  • ColumnStore Monitor
  • Aurora Monitor

In this setup, we are going to use the Galera Monitor module called "galeramon". Firstly, we need to create a database user to be used by MaxScale on one of the servers in the MariaDB Cluster. In this example we picked mariadbgalera1, 192.168.0.221 to run the following statements:

MariaDB> CREATE USER maxscale_monitor@'192.168.0.220' IDENTIFIED BY 'MaXSc4LeP4ss';
MariaDB> GRANT SELECT ON mysql.* TO 'maxscale_monitor'@'192.168.0.220';
MariaDB> GRANT SHOW DATABASES ON *.* TO 'maxscale_monitor'@'192.168.0.220';

Where 192.168.0.220 is the IP address of our MaxScale server.

It's not safe to store the maxscale_monitor user password in plain text. It's highly recommended to store the password in an encrypted format instead. To achieve this, we need to generate a secret key specifically for this MaxScale instance. Use the "maxkeys" utility to generate the secret key that will be used by MaxScale for encryption and decryption purposes:

$ maxkeys
Generating .secrets file in /var/lib/maxscale.

Now we can use the maxpasswd utility to generate the encrypted value of our password:

$ maxpasswd MaXSc4LeP4ss
D91DB5813F7C815B351CCF7D7F1ED6DB

We will always use the above value instead when storing our monitoring user credentials inside MaxScale. Now we are ready to add the Galera monitoring service into MaxScale using maxctrl:

maxctrl> create monitor galera_monitor galeramon servers=mariadbgalera1,mariadbgalera2,mariadbgalera3 user=maxscale_monitor password=D91DB5813F7C815B351CCF7D7F1ED6DB

Verify with the following command:

Adding Services into MaxScale

Service is basically how MaxScale should route the queries to the backend servers. MaxScale 2.4 supports multiple services (or routers), namely:

  • Avrorouter
  • Binlogrouter
  • Cat
  • CLI
  • HintRouter
  • Readconnroute
  • Readwritesplit
  • SchemaRouter
  • SmartRouter

For our MariaDB Cluster, we only need two routing services - Read-write split and round-robin load balancing. For read-write splitting, write queries will be forwarded to only a single MariaDB server until the server is unreachable, where MaxScale will then forward the write queries to the next available node. For round-robin balancing, the queries will be forwarded to all of the backend nodes in a round-robin fashion.

Create a routing service for round-robin (or multi-master):

maxctrl> create service Round-Robin-Service readconnroute user=maxscale_monitor password=D91DB5813F7C815B351CCF7D7F1ED6DB --servers mariadbgalera1 mariadbgalera2 mariadbgalera3

Create another routing service for read-write splitting (or single-master):

maxctrl> create service Read-Write-Service readwritesplit user=maxscale_monitor password=D91DB5813F7C815B351CCF7D7F1ED6DB --servers mariadbgalera1 mariadbgalera2 mariadbgalera3

Verify with:

All the successfully created components by MaxCtrl will generate its own configuration file under /var/lib/maxscale/maxscale.cnf.d. At this point, the directory looks like this:

$ ls -l /var/lib/maxscale/maxscale.cnf.d
total 24
-rw-r--r--. 1 maxscale maxscale  532 Jul  5 13:18 galera_monitor.cnf
-rw-r--r--. 1 maxscale maxscale  250 Jul  5 12:55 mariadbgalera1.cnf
-rw-r--r--. 1 maxscale maxscale  250 Jul  5 12:55 mariadbgalera2.cnf
-rw-r--r--. 1 maxscale maxscale  250 Jul  5 12:56 mariadbgalera3.cnf
-rw-r--r--. 1 maxscale maxscale 1128 Jul  5 16:01 Read-Write-Service.cnf
-rw-r--r--. 1 maxscale maxscale  477 Jul  5 16:00 Round-Robin-Service.cnf

Adding Listeners into MaxScale

Listeners represent the ports the service will listen to incoming connections. It can be a port or UNIX socket file and the component type must be "listener". Commonly, listeners are tied to services. In our setup, we are going to create two listeners - Read-Write Listener on port 3306 and Round-Robin Listener on port 3307:

maxctrl> create listener Read-Write-Service Read-Write-Listener 3306 --interface=0.0.0.0 --authenticator=MariaDBAuth
maxctrl> create listener Round-Robin-Service Round-Robin-Listener 3307 --interface=0.0.0.0 --authenticator=MariaDBAuth

Verify with the following commands:

At this point, our MaxScale is now ready to load balance the queries to our MariaDB Cluster. From the applications, send the queries to the MaxScale host on port 3306, where the write queries will always hit the same database node while the read queries will be sent to the other two nodes. This is also known as a single-writer setup. If you would like to use a multi-writer setup, where writes will be forwarded to all backend MariaDB nodes based on round-robin balancing algorithms. You can further fine-tune the balancing by using priority and weight.

Again, when changing the configuration options via maxctrl, all successfully created components will have its own configuration file inside /var/lib/maxscale/maxscale.cnf.d, as shown in the following output:

$ ls -l /var/lib/maxscale/maxscale.cnf.d
-rw-r--r--. 1 maxscale maxscale  532 Jul  5 13:18 galera_monitor.cnf
-rw-r--r--. 1 maxscale maxscale  250 Jul  5 12:55 mariadbgalera1.cnf
-rw-r--r--. 1 maxscale maxscale  250 Jul  5 12:55 mariadbgalera2.cnf
-rw-r--r--. 1 maxscale maxscale  250 Jul  5 12:56 mariadbgalera3.cnf
-rw-r--r--. 1 maxscale maxscale  259 Jul  5 16:06 Read-Write-Listener.cnf
-rw-r--r--. 1 maxscale maxscale 1128 Jul  5 16:06 Read-Write-Service.cnf
-rw-r--r--. 1 maxscale maxscale  261 Jul  5 16:06 Round-Robin-Listener.cnf
-rw-r--r--. 1 maxscale maxscale  477 Jul  5 16:06 Round-Robin-Service.cnf

The above configuration options can be directly modified to further suit your needs, but it requires the MaxScale service to be restarted to load the new changes. If you would like to start fresh again, you could wipe everything under this directory and restart MaxScale.

In the next episode, we will look into MaxCtrl's management and monitoring commands for our MariaDB Cluster.

What's New in MariaDB MaxScale 2.4

$
0
0

MaxScale 2.4 was released on December 21st, 2019, and ClusterControl 1.7.6 supports the monitoring and managing up to this version. However, for deployment, ClusterControl only supports up to version 2.3. One has to manually upgrade the instance manually, and fortunately, the upgrade steps are very straightforward. Just download the latest version from MariaDB MaxScale download page and perform the package installation command. 

The following commands show how to upgrade from an existing MaxScale 2.3 to MaxScale 2.4 on a CentOS 7 box:

$ wget https://dlm.mariadb.com/1067184/MaxScale/2.4.10/centos/7/x86_64/maxscale-2.4.10-1.centos.7.x86_64.rpm
$ systemctl stop maxscale
$ yum localinstall -y maxscale-2.4.10-1.centos.7.x86_64.rpm
$ systemctl start maxscale
$ maxscale --version
MaxScale 2.4.10

In this blog post, we are going to highlight some of the notable improvements and new features of this version and how it looks like in action. For a full list of changes in MariaDB MaxScale 2.4, check out its changelog.

Interactive Mode Command History

This is basically a small improvement with a major impact on MaxScale administration and monitoring task efficiency. The interactive mode for MaxCtrl now has its command history. Command history easily allows you to repeat the executed command by pressing the up or down arrow key. However, Ctrl+R functionality (recall the last command matching the characters you provide) is still not there.

In the previous versions, one has to use the standard shell mode to make sure the commands are captured by .bash_history file.

GTID Monitoring for galeramon

This is a good enhancement for those who are running on Galera Cluster with geographical redundancy via asynchronous replication, also known as cluster-to-cluster replication, or MariaDB Galera Cluster replication over MariaDB Replication.

In MaxScale 2.3 and older, this is what it looks like if you have enabled master-slave replication between MariaDB Clusters:

Maxscale 2.4

For MaxScale 2.4, it is now looking like this (pay attention to Galera1's row):

Maxscale 2.4

It's now easier to see the replication state for all nodes from MaxScale, without the need to check on individual nodes repeatedly.

SmartRouter

This is one of the new major features in MaxScale 2.4, where MaxScale is now smart enough to learn which backend MariaDB backend server is the best to process the query. SmartRouter keeps track of the performance, or the execution time, of queries to the clusters. Measurements are stored with the canonical of a query as the key. The canonical of a query is the SQL with all user-defined constants replaced with question marks, for example:

UPDATE `money_in` SET `accountholdername` = ? , `modifiedon` = ? , `status` = ? , `modifiedby` = ? WHERE `id` = ? 

This is a very useful feature if you are running MariaDB on a multi-site geographical replication or a mix of MariaDB storage engines in one replication chain, for example, a dedicated slave to handle transaction workloads (OLTP) with InnoDB storage engine and another dedicated slave to handle analytics workloads (OLAP) with Columnstore storage engine.

Supposed we are having two sites - Sydney and Singapore as illustrated in the following diagram:

Maxscale 2.4

The primary site is located in Singapore and has a MariaDB master and a slave, while another read-only slave is located in Sydney. The application connects to the MaxScale instance located in its respective country with the following port settings:

  • Read-write split: 3306
  • Round robin: 3307
  • Smart router: 3308

Our SmarRouter service and listener definitions are:

[SmartQuery]
type=service
router=smartrouter
servers=DB_1,DB_2,DB_5
master=DB_1
user=maxscale
password=******
[SmartQuery-Listener]
type = listener
service = SmartQuery
protocol = mariadbclient
port = 3308

Restart MaxScale and start sending a read-only query to both MaxScale nodes located in Singapore and Sydney. If the query is processed by the round-robin router (port 3307), we would see the query is being routed based on the round-robin algorithm:

(app)$ mysql -usbtest -p -h maxscale_sydney -P3307 -e 'SELECT COUNT(id),@@hostname FROM sbtest.sbtest1'
+-----------+--------------------+
| count(id) | @@hostname         |
+-----------+--------------------+
|   1000000 | mariadb_singapore2 |
+-----------+--------------------+

From the above, we can tell that Sydney's MaxScale forwarded the above query to our Singapore's slave, which is not the best routing option per se.

With SmartRouter listening on port 3308, we would see the query is being routed to the nearest slave in Sydney:

(app)$ mysql -usbtest -p -h maxscale_sydney -P3308 -e 'SELECT COUNT(id),@@hostname FROM sbtest.sbtest1'
+-----------+-----------------+
| count(id) | @@hostname      |
+-----------+-----------------+
|   1000000 | mariadb_sydney1 |
+-----------+-----------------+

And if the same query is executed in our Singapore site, it will be routed to the MariaDB slave located in Singapore:

(app)$ mysql -usbtest -p -h maxscale_singapore -P3308 -e 'SELECT COUNT(id),@@hostname FROM sbtest.sbtest1'
+-----------+--------------------+
| count(id) | @@hostname         |
+-----------+--------------------+
|   1000000 | mariadb_singapore2 |
+-----------+--------------------+

There is a catch though. When SmartRouter sees a read-query whose canonical has not been seen before, it will send the query to all clusters. The first response from a cluster will designate that cluster as the best one for that canonical. Also, when the first response is received, the other queries are canceled. The response is sent to the client once all clusters have responded to the query or the cancel.

This means, to keep track of the canonical query (normalized query) and measure its performance, you probably will see the very first query fails in its first execution, for example:

(app)$ mysql -usbtest -p -h maxscale_sydney -P3308 -e 'SELECT COUNT(id),@@hostname FROM sbtest.sbtest1'
ERROR 2013 (HY000) at line 1: Lost connection to MySQL server during query

From the general log in MariaDB Sydney, we can tell that the first query (ID 74) was executed successfully (connect, query and quit), despite the "Lost connection" error from MaxScale:

  74 Connect  sbtest@3.25.143.151 as anonymous on 
  74 Query    SELECT COUNT(id),@@hostname FROM sbtest.sbtest1
  74 Quit

While the identical subsequent query was correctly processed and returned with the correct response:

(app)$ mysql -usbtest -p -h maxscale_sydney -P3308 -e 'SELECT COUNT(id),@@hostname FROM sbtest.sbtest1'
+-----------+------------------------+
| count(id) | @@hostname             |
+-----------+------------------------+
|   1000000 | mariadb_sydney.cluster |
+-----------+------------------------+

Looking again at the general log in MariaDB Sydney (ID 75), the same processing events happened just like the first query:

  75 Connect  sbtest@3.25.143.151 as anonymous on 
  75 Query    SELECT COUNT(id),@@hostname FROM sbtest.sbtest1
  75 Quit

From this observation, we can conclude that occasionally, MaxScale has to fail the first query in order to measure performance and become smarter for the subsequent identical queries. Your application must be able to handle this "first error" properly before returning to the client or retry the transaction once more.

UNIX Socket for Server

There are multiple ways to connect to a running MySQL or MariaDB server. You could use the standard networking TCP/IP with host IP address and port (remote connection), named pipes/shared memory on Windows or Unix socket files on Unix-based systems. The UNIX socket file is a special kind of file that facilitates communications between different processes, which in this case is the MySQL client and the server. The socket file is a file-based communication, and you can't access the socket from another machine. It provides a faster connection than TCP/IP (no network overhead) and a more secure connection approach because it can be used only when connecting to a service or process on the same computer.

Supposed the MaxScale server is also installed on the MariaDB Server itself, we can use the socket UNIX socket file instead. Under the Server section, remove or comment the "address" line and add the socket parameter with the location of the socket file:

[DB_2]
type=server
protocol=mariadbbackend
#address=54.255.133.39
socket=/var/lib/mysql/mysql.sock

Before applying the above changes, we have to create a MaxScale axscale user from localhost. On the master server:

MariaDB> CREATE USER 'maxscale'@'localhost' IDENTIFIED BY 'maxscalep4ss';
MariaDB> GRANT SELECT ON mysql.user TO 'maxscale'@'localhost';
MariaDB> GRANT SELECT ON mysql.db TO 'maxscale'@'localhost';
MariaDB> GRANT SELECT ON mysql.tables_priv TO 'maxscale'@'localhost';
MariaDB> GRANT SHOW DATABASES ON *.* TO 'maxscale'@'localhost';

After a restart, MaxScale will show the UNIX socket path instead of the actual address, and the server listing will be shown like this:

Maxscale 2.4

As you can see, the state and GTID information are retrieved correctly through a socket connection. Note that this DB_2 is still listening to port 3306 for the remote connections. It just shows that MaxScale uses a socket to connect to this server for monitoring.

Using socket is always better due to the fact that it only allows local connections and it is more secure. You could also close down your MariaDB server from the network (e.g, --skip-networking) and let MaxScale handle the "external" connections and forward them to the MariaDB server via UNIX socket file.

Server Draining

In MaxScale 2.4, the backend servers can be drained, which means existing connections can continue to be used, but no new connections will be created to the server. With the drain feature, we can perform a graceful maintenance activity without affecting the user experience from the application side. Note that draining a server can take a longer time, depending on the running queries that need to be gracefully closed.

To drain a server, use the following command:

Maxscale 2.4

The after-effect could be one of the following states:

  • Draining - The server is being drained.
  • Drained - The server has been drained. The server was being drained and now the number of connections to the server has dropped to 0.
  • Maintenance - The server is under maintenance.

After a server has been drained, the state of the MariaDB server from MaxScale point of view is "Maintenance":

Maxscale 2.4

When a server is in maintenance mode, no connections will be created to it and existing connections will be closed.

Conclusion

MaxScale 2.4 brings a lot of improvements and changes over the previous version and it's the best database proxy to handle MariaDB servers and all of its components.

Deploying MariaDB Replication for High Availability

$
0
0

MariaDB Server offers asynchronous and synchronous replication. It can be set up to have a multi-source replication or with a multi-master setup. 

For a read and write intensive application, a master-slave setup is common, but can differ based on the underlying stack needed to build a highly available database environment. 

Having a master-slave replication setup might not satisfy your needs, especially in a production environment. A MariaDB Server alone (master-slave setup) is not enough to offer high availability as it still has a single point of failure (SPOF). 

MariaDB introduced an enterprise product (MariaDB Platform) to address this high availability issue. It includes various components: an enterprise version of MariaDB, MariaDB ColumnStore, MaxScale, and lightweight MariaDB Connectors. Compared to other vendors with the same enterprise solution offering, it could be a cost effective option, however not everyone needs this level of complexity.

In this blog, we'll show you how to use MariaDB Server using replication on a highly available environment with the option to choose from using all free tools or our cost-efficient, management software to run and monitor your MariaDB Server infrastructure.

MariaDB High-Availability Topology Setup

A usual setup for a master-slave topology with MariaDB Server uses asynchronous or synchronous approach with just one master receiving writes, then replicates its changes to the slaves just like the diagram below:

MariaDB High-Availability Topology Setup

But then again, this doesn't serve any high availability and has a single point of failure. If the master dies, then your application client no longer functions. Now, we need to add in the stack to have an auto-failover mechanism to avoid SPOF and also offers load balancing for splitting read-writes and in a round-robin fashion. So for now, we'll end up having the type of topology,

MariaDB High-Availability Topology Setup

Now, this topology serves more safety in terms of SPOF. MaxScale will do the read and write splitting over the database nodes from your master against the slaves. MaxScale does a perfect approach when dealing with this type of setup. MaxScale also has auto-detection built-in. So whatever changes occur on the state of your database nodes, it will detect and act accordingly. MaxScale has the availability to proceed a failover or even a switchover. To know more about its failover mechanism, read our previous blog which tackles the mechanism of MariaDB MaxScale failover. 

Take note that MaxScale failover mechanism with MariaDB Monitor also has its limitations. It's best applied only for a master-slave setup with no overcomplicated setup. This means that a master-master setup is not supported. However, MaxScale has more things to offer. It does not only do some load balancing as it performs read-write splits, it has built-in SmartRouter which sends the query to the most performant node. Although this doesn't add the feature of being highly available but it helps the nodes from getting stuck in traffic and avoid certain database nodes from under-performing that can cause timeouts or to a totally unavailable server caused by high resource intensive activity on-going.

One thing as a caveat of using MaxScale, they are using BSL (Business Source LIcense). You might have to review the FAQ before adopting this software.

Another option to choose from is using a more convenient approach. It can be cost-efficient for you to choose using ClusterControl and have proxies in the middle using HaProxy, MaxScale, or ProxySQL, for which the latter can be configured to from light-weight to a more production-level configuration that does query routing, query filtering, firewall, or security. See the illustration below:

MariaDB High-Availability Topology Setup

Now, sitting on top of them is the ClusterControl. ClusterControl is set up with a high availability i.e. CMON HA. Alternatively, the proxy layer can be chosen from either HaProxy--a very lightweight option to choose from, MaxScale, as mentioned previously, or ProxySQL which has a more refined set of parameters if you want more flexibility and configuration ideal for a high-scaled production setup. ClusterControl will handle the auto-detection in terms of the health status of the nodes, especially the master which is the main node to determine if it requires a failover or not. Now, this can be more self-sufficient yet it adds more cost due to a number of nodes required to implement this setup and also using ClusterControl auto-failover which applies on our advance and enterprise license. But on the other hand, it provides you all the safety, security, and observability towards your database infrastructure. It is actually more of a low-cost enterprise implementation compared to the available solutions in the global market.

Deploying Your MariaDB Master-Slave Replication for High Availability

Let's assume that you have an existing master-slave setup of MariaDB. For this example, we’ll use ClusterControl using the free community edition which you can install and use free of charge. It just makes your work easy and quick to set up. To do this, you just have to import your existing MariaDB Replication cluster. Checkout our previous blog on how to manage MariaDB with ClusterControl. For this blog, I have the following setup initially as my MariaDB Replication cluster as seen below:

Deploying Your MariaDB Master-Slave Replication for High Availability

Now, let's use MaxScale here as an alternative solution from MariaDB Platform which also offers high availability. To do that, it's very easy to use with ClusterControl by just a few clicks, you are then able to set up your MaxScale that is running on-top of your existing MariaDB Replication cluster. To do that, just go to Manage → Load Balancer → MaxScale, and you'll be able to setup and provide the appropriate values as seen below,

Deploying Your MariaDB Master-Slave Replication for High Availability

Then just enable or click the checkbox option to select which servers have to be added as part of your MaxScale monitoring. See below,

Deploying Your MariaDB Master-Slave Replication for High Availability

Assuming that you have more than one MaxScale node to add, just repeat the same steps.

Lastly, we'll set up Keepalived to keep our MaxScale nodes always available whenever necessary. This is just  very quick with just simple steps using ClusterControl. Again, you have to go to Manage → Load Balancer but instead, select Keepalived,

Deploying Your MariaDB Master-Slave Replication for High Availability

As you've noticed, I've placed my Keepalived along with MaxScale on the same node of my slave (192.168.10.30). Whereas, on the other hand, the second (2nd) Keepalived is running on 192.168.10.40 along with Maxscale on the same host.

The result of the topology is production ready which can provide you query routing, high availability, and with auto-failover equipped with extensive monitoring and observability using ClusterControl. See below,

Deploying Your MariaDB Master-Slave Replication for High Availability

Conclusion

Using MariaDB Server replication alone does not offer you high availability. Extending and using third-party tools will equip you to have your database stack highly available by not only relying on MariaDB products or even using MariaDB Platform. 

There are ways to achieve this and manage it to be more cost-effective. Yet, there is a huge difference to availing to these solutions available in the market such as ClusterControl since it provides you speed, less hassle,, and of course the ultimate observability with real-time and up-to-date events not only the health but also the events occurring in your database cluster.


MaxScale Basic Management Using MaxCtrl for MariaDB Cluster

$
0
0

In the previous blog post, we have covered some introductions to MaxScale installation, upgrade, and deployment using MaxCtrl command-line client. In this blog post, we are going to cover the MaxScale management aspects for our MariaDB Cluster. 

There are a number of MaxScale components that we can manage with MaxCtrl, namely:

  1. Server management
  2. Service management
  3. Monitor management
  4. Listener management
  5. Filter management
  6. MaxScale management
  7. Logging management

In this blog post, we are going to cover the first 4 components which are commonly used in MariaDB Cluster. All of the commands in this blog post are based on MaxScale 2.4.11. 

Server Management

List/Show Servers

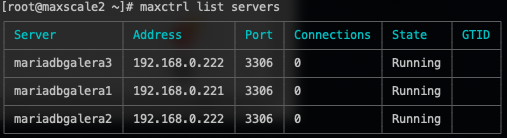
List a summary of all servers in MaxScale:

 maxctrl: list servers
┌────────────────┬────────────────┬──────┬─────────────┬─────────────────────────┬─────────────┐
│ Server         │ Address        │ Port │ Connections │ State                   │ GTID        │
├────────────────┼────────────────┼──────┼─────────────┼─────────────────────────┼─────────────┤
│ mariadbgalera1 │ 192.168.10.201 │ 3306 │ 0           │ Slave, Synced, Running  │ 100-100-203 │
├────────────────┼────────────────┼──────┼─────────────┼─────────────────────────┼─────────────┤
│ mariadbgalera2 │ 192.168.10.202 │ 3306 │ 0           │ Slave, Synced, Running  │ 100-100-203 │
├────────────────┼────────────────┼──────┼─────────────┼─────────────────────────┼─────────────┤
│ mariadbgalera3 │ 192.168.10.203 │ 3306 │ 0           │ Master, Synced, Running │ 100-100-203 │
└────────────────┴────────────────┴──────┴─────────────┴─────────────────────────┴─────────────┘

For MariaDB Cluster, the server list summarizes the node and cluster state, with its MariaDB GTID, only if the cluster is set to replicate from another cluster via the standard MariaDB Replication. The state is used by MaxScale to control the behavior of the routing algorithm:

  • Master - For a Cluster, this is considered the Write-Master.
  • Slave - If all slaves are down, but the master is still available, then the router will use the master.
  • Synced - A Cluster node which is in a synced state with the cluster.
  • Running - A server that is up and running. All servers that MariaDB MaxScale can connect to are labeled as running.

Although MariaDB Cluster is capable of handling multi-master replication, MaxScale will always pick one node to hold the Master role which will receive all writes for readwritesplit routing. By default, the Galera Monitor will choose the node with the lowest wsrep_local_index value as the master. This will mean that two MaxScales running on different servers will choose the same server as the master.

Show all servers in more detail:

maxctrl: show servers

Create Servers

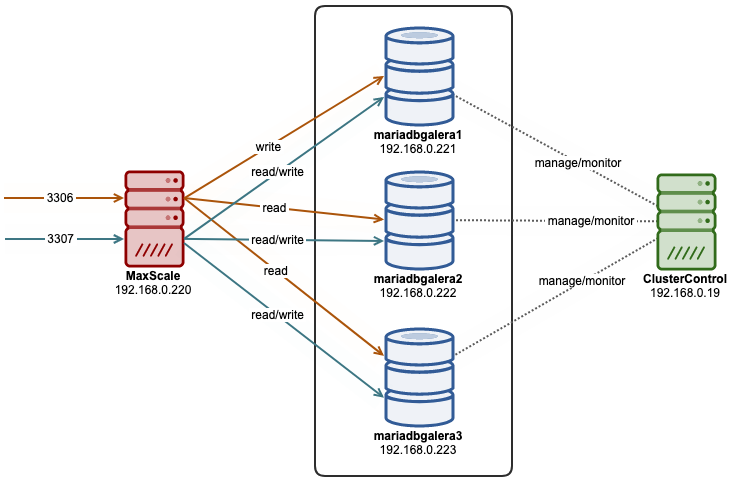
This is commonly the first thing you need to do when setting up MaxScale as a load balancer. It's common to add all of the MariaDB Cluster nodes into MaxScale and label it with an object name. In this example, we label the Galera nodes as in "mariadbgalera#" format:

maxctrl: create server mariadbgalera1 192.168.0.221 3306
maxctrl: create server mariadbgalera2 192.168.0.222 3306
maxctrl: create server mariadbgalera3 192.168.0.222 3306

The server state will only be reported correctly after we have activated the monitoring module, as shown under the Monitor Management section further down.

Delete a Server

To delete a server, one has to unlink the server from any services or monitors beforehand. As an example, in the following server list, we would want to delete mariadbgalera3 from MaxScale:

  maxctrl: list servers
┌────────────────┬────────────────┬──────┬─────────────┬─────────────────────────┬─────────────┐
│ Server         │ Address        │ Port │ Connections │ State                   │ GTID        │
├────────────────┼────────────────┼──────┼─────────────┼─────────────────────────┼─────────────┤
│ mariadbgalera1 │ 192.168.10.201 │ 3306 │ 0           │ Slave, Synced, Running  │ 100-100-203 │
├────────────────┼────────────────┼──────┼─────────────┼─────────────────────────┼─────────────┤
│ mariadbgalera2 │ 192.168.10.202 │ 3306 │ 0           │ Slave, Synced, Running  │ 100-100-203 │
├────────────────┼────────────────┼──────┼─────────────┼─────────────────────────┼─────────────┤
│ mariadbgalera3 │ 192.168.10.203 │ 3306 │ 0           │ Master, Synced, Running │ 100-100-203 │
└────────────────┴────────────────┴──────┴─────────────┴─────────────────────────┴─────────────┘

List out all monitors and see if the server is part of any monitor module:


 maxctrl: list monitors
 ┌─────────────────┬─────────┬────────────────────────────────────────────────┐
 │ Monitor         │ State   │ Servers                                        │
 ├─────────────────┼─────────┼────────────────────────────────────────────────┤
 │ MariaDB-Monitor │ Running │ mariadbgalera1, mariadbgalera2, mariadbgalera3 │
 └─────────────────┴─────────┴────────────────────────────────────────────────┘

Looks like mariadbgalera3 is part of MariaDB-Monitor, so we have to remove it first by using the "unlink monitor" command:

 maxctrl: unlink monitor MariaDB-Monitor mariadbgalera3
 OK

Next, list out all services to check if the corresponding server is part of any MaxScale services:

  maxctrl: list services
┌─────────────────────┬────────────────┬─────────────┬───────────────────┬────────────────────────────────────────────────┐
│ Service             │ Router         │ Connections │ Total Connections │ Servers                                        │
├─────────────────────┼────────────────┼─────────────┼───────────────────┼────────────────────────────────────────────────┤
│ Read-Write-Service  │ readwritesplit │ 1           │ 1                 │ mariadbgalera1, mariadbgalera2, mariadbgalera3 │
├─────────────────────┼────────────────┼─────────────┼───────────────────┼────────────────────────────────────────────────┤
│ Round-Robin-Service │ readconnroute  │ 1           │ 1                 │ mariadbgalera1, mariadbgalera2, mariadbgalera3 │
├─────────────────────┼────────────────┼─────────────┼───────────────────┼────────────────────────────────────────────────┤
│ Replication-Service │ binlogrouter   │ 1           │ 1                 │                                                │
└─────────────────────┴────────────────┴─────────────┴───────────────────┴────────────────────────────────────────────────┘

As you can see, mariadbgalera3 is part of the Read-Write-Service and Round-Robin-Service. Remove the server from those services by using "unlink service" command:

 maxctrl: unlink service Read-Write-Service mariadbgalera3
OK
 maxctrl: unlink service Round-Robin-Service mariadbgalera3
OK

Finally, we can remove the server from MaxScale by using the "destroy server" command:

 maxctrl: destroy server mariadbgalera3
OK

Verify using the "list servers" that we have removed mariadbgalera3 from MaxScale.:

  maxctrl: list servers
┌────────────────┬────────────────┬──────┬─────────────┬─────────────────────────┬──────┐
│ Server         │ Address        │ Port │ Connections │ State                   │ GTID │
├────────────────┼────────────────┼──────┼─────────────┼─────────────────────────┼──────┤
│ mariadbgalera1 │ 192.168.10.201 │ 3306 │ 0           │ Master, Synced, Running │      │
├────────────────┼────────────────┼──────┼─────────────┼─────────────────────────┼──────┤
│ mariadbgalera2 │ 192.168.10.202 │ 3306 │ 0           │ Slave, Synced, Running  │      │
└────────────────┴────────────────┴──────┴─────────────┴─────────────────────────┴──────┘

Modify Server's Parameter

To modify a server's parameter, one can use the "alter server" command which only takes one key/value parameter at a time. For example:

  maxctrl: alter server mariadbgalera3 priority 10
 OK

Use the "show server" command and look into the Parameters section, for a list of parameters that can be changed for the "server" object:

maxctrl: show server mariadbgalera3
...

│ Parameters       │ {                                         │
│                  │     "address": "192.168.10.203",          │
│                  │     "protocol": "mariadbbackend",         │
│                  │     "port": 3306,                         │
│                  │     "extra_port": 0,                      │
│                  │     "authenticator": null,                │
│                  │     "monitoruser": null,                  │
│                  │     "monitorpw": null,                    │
│                  │     "persistpoolmax": 0,                  │
│                  │     "persistmaxtime": 0,                  │
│                  │     "proxy_protocol": false,              │
│                  │     "ssl": "false",                       │
│                  │     "ssl_cert": null,                     │
│                  │     "ssl_key": null,                      │
│                  │     "ssl_ca_cert": null,                  │
│                  │     "ssl_version": "MAX",                 │
│                  │     "ssl_cert_verify_depth": 9,           │
│                  │     "ssl_verify_peer_certificate": false, │
│                  │     "disk_space_threshold": null,         │
│                  │     "priority": "10"│
│                  │ }

Note that alter command effect is immediate and the parameter's value in the runtime will be modified as well as the value in its individual MaxScale configuration file inside /var/lib/maxscale/maxscale.cnf.d/ for persistence across restart.

Set Server State

MaxScale allows the backend Galera servers to be temporarily excluded from the load balancing set by activating the maintenance mode. We can achieve this by using the "set server" command:

 maxctrl: set server mariadbgalera3 maintenance
OK

When looking at the state of the server, we should see this:

 maxctrl: show server mariadbgalera3
...
│ State            │ Maintenance, Running
...

When a server is in maintenance mode, no connections will be created to it and existing connections will be closed. To clear the maintenance state from the host, use the "clear server" command:

 maxctrl: clear server mariadbgalera3 maintenance
OK

Verify with "show server":

 maxctrl: show server mariadbgalera3
...
│ State            │ Slave, Synced, Running                    │
...

Monitor Management

Create a Monitor

The MaxScale monitor module for MariaDB Cluster is called galeramon. Defining a correct monitoring module is necessary so MaxScale can determine the best routing for queries depending on the state of the nodes. For example, if a Galera node is serving as a donor for a joiner node, should it be part of the healthy nodes? In some cases like where the database size is so small, marking a donor node as healthy (by setting the parameter available_when_donor=true in MaxScale) is not a bad plan and sometimes improves the query routing performance.

To create a service (router), one must create a monitoring user on the backend of MariaDB servers. Commonly, one would use the same monitoring user that we have defined for the monitor module. For Galera Cluster, if the monitoring user does not exist, just create it on one of the nodes with the following privileges:

MariaDB> CREATE USER maxscale_monitor@'192.168.0.220' IDENTIFIED BY 'MaXSc4LeP4ss';
MariaDB> GRANT SELECT ON mysql.* TO 'maxscale_monitor'@'192.168.0.220';
MariaDB> GRANT SHOW DATABASES ON *.* TO 'maxscale_monitor'@'192.168.0.220';

Use the "create monitor" command and specify a name with galeramon as the monitor module:

  maxctrl: create monitor MariaDB-Monitor galeramon servers=mariadbgalera1,mariadbgalera2,mariadbgalera3 user=maxscale_monitor password=MaXSc4LeP4ss
OK

Note that we didn't configure MaxScale secret which means we store the user password in plain text format. To enable encryption, see the example in this blog post, Introduction to MaxScale Administration Using maxctrl for MariaDB Cluster under Adding Monitoring into MaxScale section.

List/Show Monitors

To list out all monitors:

 maxctrl: list monitors
┌─────────────────┬─────────┬────────────────────────────────────────────────┐
│ Monitor         │ State   │ Servers                                        │
├─────────────────┼─────────┼────────────────────────────────────────────────┤
│ MariaDB-Monitor │ Running │ mariadbgalera1, mariadbgalera2, mariadbgalera3 │
└─────────────────┴─────────┴────────────────────────────────────────────────┘

To get a more detailed look on the monitor, use the "show monitor" command:

 maxctrl: show monitor MariaDB-Monitor

┌─────────────────────┬───────────────────────────────────────────┐
│ Monitor             │ MariaDB-Monitor                           │
├─────────────────────┼───────────────────────────────────────────┤
│ State               │ Running                                   │
├─────────────────────┼───────────────────────────────────────────┤
│ Servers             │ mariadbgalera1                            │
│                     │ mariadbgalera2                            │
│                     │ mariadbgalera3                            │
├─────────────────────┼───────────────────────────────────────────┤
│ Parameters          │ {                                         │
│                     │     "user": "maxscale_monitor",           │
│                     │     "password": "*****",                  │
│                     │     "passwd": null,                       │
│                     │     "monitor_interval": 2000,             │
│                     │     "backend_connect_timeout": 3,         │
│                     │     "backend_read_timeout": 1,            │
│                     │     "backend_write_timeout": 2,           │
│                     │     "backend_connect_attempts": 1,        │
│                     │     "journal_max_age": 28800,             │
│                     │     "disk_space_threshold": null,         │
│                     │     "disk_space_check_interval": 0,       │
│                     │     "script": null,                       │
│                     │     "script_timeout": 90,                 │
│                     │     "events": "all",                      │
│                     │     "disable_master_failback": false,     │
│                     │     "available_when_donor": true,         │
│                     │     "disable_master_role_setting": false, │
│                     │     "root_node_as_master": false,         │
│                     │     "use_priority": false,                │
│                     │     "set_donor_nodes": false              │
│                     │ }                                         │
├─────────────────────┼───────────────────────────────────────────┤
│ Monitor Diagnostics │ {                                         │
│                     │     "disable_master_failback": false,     │
│                     │     "disable_master_role_setting": false, │
│                     │     "root_node_as_master": false,         │
│                     │     "use_priority": false,                │
│                     │     "set_donor_nodes": false              │
│                     │ }                                         │
└─────────────────────┴───────────────────────────────────────────┘

Stop/Start Monitor

Stopping a monitor will pause the monitoring of the servers. This commonly being used in conjunction with "set server" command to manually control server states. To stop the monitoring service use the "stop monitor" command:

 maxctrl: stop monitor MariaDB-Monitor
OK

Verify the state with "show monitor":

 maxctrl: show monitors MariaDB-Monitor
┌─────────────────────┬───────────────────────────────────────────┐
│ Monitor             │ MariaDB-Monitor                           │
├─────────────────────┼───────────────────────────────────────────┤
│ State               │ Stopped                                   │
...

To start it up again, use the "start monitor":

 maxctrl: start monitor MariaDB-Monitor
OK

Modify Monitor's Parameter

To change a parameter for this monitor, use the "alter monitor" command and specify the parameter key/value as below:

 maxctrl: alter monitor MariaDB-Monitor available_when_donor true
OK

Use the "show monitor" command and look into the Parameters section, for a list of parameters that can be changed for the galeramon module:

maxctrl: show server mariadbgalera3
...
│ Parameters          │ {                                         │
│                     │     "user": "maxscale_monitor",           │
│                     │     "password": "*****",                  │
│                     │     "monitor_interval": 2000,             │
│                     │     "backend_connect_timeout": 3,         │
│                     │     "backend_read_timeout": 1,            │
│                     │     "backend_write_timeout": 2,           │
│                     │     "backend_connect_attempts": 1,        │
│                     │     "journal_max_age": 28800,             │
│                     │     "disk_space_threshold": null,         │
│                     │     "disk_space_check_interval": 0,       │
│                     │     "script": null,                       │
│                     │     "script_timeout": 90,                 │
│                     │     "events": "all",                      │
│                     │     "disable_master_failback": false,     │
│                     │     "available_when_donor": true,         │
│                     │     "disable_master_role_setting": false, │
│                     │     "root_node_as_master": false,         │
│                     │     "use_priority": false,                │
│                     │     "set_donor_nodes": false              │
│                     │ }                                         │

Delete a Monitor

In order to delete a monitor, one has to remove all servers linked with the monitor first. For example, consider the following monitor in MaxScale:

 maxctrl: list monitors
┌─────────────────┬─────────┬────────────────────────────────────────────────┐
│ Monitor         │ State   │ Servers                                        │
├─────────────────┼─────────┼────────────────────────────────────────────────┤
│ MariaDB-Monitor │ Running │ mariadbgalera1, mariadbgalera2, mariadbgalera3 │
└─────────────────┴─────────┴────────────────────────────────────────────────┘

Remove all servers from that particular service:

 maxctrl: unlink monitor MariaDB-Monitor mariadbgalera1 mariadbgalera2 mariadbgalera3

OK

Our monitor is now looking like this:

 maxctrl: list monitors
┌─────────────────┬─────────┬─────────┐
│ Monitor         │ State   │ Servers │
├─────────────────┼─────────┼─────────┤
│ MariaDB-Monitor │ Running │         │
└─────────────────┴─────────┴─────────┘

Only then we can delete the monitor:

 maxctrl: destroy monitor MariaDB-Monitor
OK

Add/Remove Servers into Monitor

After creating a monitor, we can use the "link monitor" command to add the Galera servers into the monitor. Use the server's name as created under Create Servers section:

 maxctrl: link monitor MariaDB-Monitor mariadbgalera1 mariadbgalera2 mariadbgalera3
OK

Similarly, to remove a server from the service, just use "unlink monitor" command:

 maxctrl: unlink monitor MariaDB-Monitor mariadbgalera3
OK

Verify with "list monitors" or "show monitors" command.

Service Management

Create a Service

To create a service (router), one must create a monitoring user on the backend of MariaDB servers. Commonly, one would use the same monitoring user that we have defined for the monitor module. For Galera Cluster, if the monitoring user does not exist, just create it on one of the nodes with the following privileges:

MariaDB> CREATE USER maxscale_monitor@'192.168.0.220' IDENTIFIED BY 'MaXSc4LeP4ss';
MariaDB> GRANT SELECT ON mysql.* TO 'maxscale_monitor'@'192.168.0.220';
MariaDB> GRANT SHOW DATABASES ON *.* TO 'maxscale_monitor'@'192.168.0.220';

Where 192.168.0.220 is the IP address of the MaxScale host.

Then, specify the name of the service, the routing type together with a monitoring user for MaxScale to connect to the backend servers:

 maxctrl: create service Round-Robin-Service readconnroute user=maxscale_monitor password=******
OK

Also, you can specify additional parameters when creating the service. In this example, we would like the "master" node to be included in the round-robin balancing set for our MariaDB Galera Cluster:

 maxctrl: create service Round-Robin-Service readconnroute user=maxscale_monitor password=****** router_options=master,slave
OK

Use the "show service" command to see the supported parameters. For round-robin router, the list as follows:

  maxctrl: show service Round-Robin-Service
...
│ Parameters          │ {                                          │
│                     │     "router_options": null,                │
│                     │     "user": "maxscale_monitor",            │
│                     │     "password": "*****",                   │
│                     │     "passwd": null,                        │
│                     │     "enable_root_user": false,             │
│                     │     "max_retry_interval": 3600,            │
│                     │     "max_connections": 0,                  │
│                     │     "connection_timeout": 0,               │
│                     │     "auth_all_servers": false,             │
│                     │     "strip_db_esc": true,                  │
│                     │     "localhost_match_wildcard_host": true, │
│                     │     "version_string": null,                │
│                     │     "weightby": null,                      │
│                     │     "log_auth_warnings": true,             │
│                     │     "retry_on_failure": true,              │
│                     │     "session_track_trx_state": false,      │
│                     │     "retain_last_statements": -1,          │
│                     │     "session_trace": 0

For the read-write split router, the supported parameters are:

  maxctrl: show service Read-Write-Service
...
│ Parameters          │ {                                                           │
│                     │     "router_options": null,                                 │
│                     │     "user": "maxscale_monitor",                             │
│                     │     "password": "*****",                                    │
│                     │     "passwd": null,                                         │
│                     │     "enable_root_user": false,                              │
│                     │     "max_retry_interval": 3600,                             │
│                     │     "max_connections": 0,                                   │
│                     │     "connection_timeout": 0,                                │
│                     │     "auth_all_servers": false,                              │
│                     │     "strip_db_esc": true,                                   │
│                     │     "localhost_match_wildcard_host": true,                  │
│                     │     "version_string": null,                                 │
│                     │     "weightby": null,                                       │
│                     │     "log_auth_warnings": true,                              │
│                     │     "retry_on_failure": true,                               │
│                     │     "session_track_trx_state": false,                       │
│                     │     "retain_last_statements": -1,                           │
│                     │     "session_trace": 0,                                     │
│                     │     "use_sql_variables_in": "all",                          │
│                     │     "slave_selection_criteria": "LEAST_CURRENT_OPERATIONS", │
│                     │     "master_failure_mode": "fail_instantly",                │
│                     │     "max_slave_replication_lag": -1,                        │
│                     │     "max_slave_connections": "255",                         │
│                     │     "retry_failed_reads": true,                             │
│                     │     "prune_sescmd_history": false,                          │
│                     │     "disable_sescmd_history": false,                        │
│                     │     "max_sescmd_history": 50,                               │
│                     │     "strict_multi_stmt": false,                             │
│                     │     "strict_sp_calls": false,                               │
│                     │     "master_accept_reads": false,                           │
│                     │     "connection_keepalive": 300,                            │
│                     │     "causal_reads": false,                                  │
│                     │     "causal_reads_timeout": "10",                           │
│                     │     "master_reconnection": false,                           │
│                     │     "delayed_retry": false,                                 │
│                     │     "delayed_retry_timeout": 10,                            │
│                     │     "transaction_replay": false,                            │
│                     │     "transaction_replay_max_size": "1Mi",                   │
│                     │     "optimistic_trx": false                                 │
│                     │ }

List/Show Services
 

To list out all created services (routers), use the "list services" command:

 maxctrl: list services
┌─────────────────────┬────────────────┬─────────────┬───────────────────┬────────────────────────────────────────────────┐
│ Service             │ Router         │ Connections │ Total Connections │ Servers                                        │
├─────────────────────┼────────────────┼─────────────┼───────────────────┼────────────────────────────────────────────────┤
│ Read-Write-Service  │ readwritesplit │ 1           │ 1                 │ mariadbgalera1, mariadbgalera2, mariadbgalera3 │
├─────────────────────┼────────────────┼─────────────┼───────────────────┼────────────────────────────────────────────────┤
│ Round-Robin-Service │ readconnroute  │ 1           │ 1                 │ mariadbgalera1, mariadbgalera2, mariadbgalera3 │
├─────────────────────┼────────────────┼─────────────┼───────────────────┼────────────────────────────────────────────────┤
│ Binlog-Repl-Service │ binlogrouter   │ 1           │ 1                 │                                                │
└─────────────────────┴────────────────┴─────────────┴───────────────────┴────────────────────────────────────────────────┘

In the above examples, we have created 3 services, with 3 different routers. However, the Binlog-Repl-Service for our binlog server is not linked with any servers yet.

To show all services in details:

 maxctrl: show services

Or if you want to show a particular service:

 maxctrl: show service Round-Robin-Service

Stop/Start Services

Stopping a service will prevent all the listeners for that service from accepting new connections. Existing connections will still be handled normally until they are closed. To stop and start all services, use the "stop services":

 maxctrl: stop services
 maxctrl: show services
 maxctrl: start services
 maxctrl: show services

Or we can use the "stop service" to stop only one particular service:

 maxctrl: stop services Round-Robin-Service

Delete a Service

In order to delete a service, one has to remove all servers and destroy the listeners associated with the service first. For example, consider the following services in MaxScale:

 maxctrl: list services
┌─────────────────────┬────────────────┬─────────────┬───────────────────┬────────────────────────────────────────────────┐
│ Service             │ Router         │ Connections │ Total Connections │ Servers                                        │
├─────────────────────┼────────────────┼─────────────┼───────────────────┼────────────────────────────────────────────────┤
│ Read-Write-Service  │ readwritesplit │ 1           │ 1                 │ mariadbgalera1, mariadbgalera2, mariadbgalera3 │
├─────────────────────┼────────────────┼─────────────┼───────────────────┼────────────────────────────────────────────────┤
│ Round-Robin-Service │ readconnroute  │ 1           │ 1                 │ mariadbgalera1, mariadbgalera2, mariadbgalera3 │
├─────────────────────┼────────────────┼─────────────┼───────────────────┼────────────────────────────────────────────────┤
│ Replication-Service │ binlogrouter   │ 1           │ 1                 │                                                │
└─────────────────────┴────────────────┴─────────────┴───────────────────┴────────────────────────────────────────────────┘

Let's remove Round-Robin-Service from the setup. Remove all servers from this particular service:

 maxctrl: unlink service Round-Robin-Service mariadbgalera1 mariadbgalera2 mariadbgalera3
OK

Our services are now looking like this:

 maxctrl: list services
┌─────────────────────┬────────────────┬─────────────┬───────────────────┬────────────────────────────────────────────────┐
│ Service             │ Router         │ Connections │ Total Connections │ Servers                                        │
├─────────────────────┼────────────────┼─────────────┼───────────────────┼────────────────────────────────────────────────┤
│ Read-Write-Service  │ readwritesplit │ 1           │ 1                 │ mariadbgalera1, mariadbgalera2, mariadbgalera3 │
├─────────────────────┼────────────────┼─────────────┼───────────────────┼────────────────────────────────────────────────┤
│ Round-Robin-Service │ readconnroute  │ 1           │ 1                 │                                                │
├─────────────────────┼────────────────┼─────────────┼───────────────────┼────────────────────────────────────────────────┤
│ Replication-Service │ binlogrouter   │ 1           │ 1                 │                                                │
└─────────────────────┴────────────────┴─────────────┴───────────────────┴────────────────────────────────────────────────┘

If the service is tied with a listener, we have to remove it as well. Use "list listeners" and specify the service name to look for it:

 maxctrl: list listeners Round-Robin-Service
┌──────────────────────┬──────┬─────────┬─────────┐
│ Name                 │ Port │ Host    │ State   │
├──────────────────────┼──────┼─────────┼─────────┤
│ Round-Robin-Listener │ 3307 │ 0.0.0.0 │ Running │
└──────────────────────┴──────┴─────────┴─────────┘

And then remove the listener:

 maxctrl: destroy listener Round-Robin-Service Round-Robin-Listener
OK

Finally, we can remove the service:

 maxctrl: destroy service Round-Robin-Service
OK

Modify Service's Parameter

Similar to the other object, one can modify a service parameter by using the "alter service" command:

 maxctrl: alter service Read-Write-Service master_accept_reads true
OK

Some routers support runtime configuration changes to all parameters. Currently all readconnroute, readwritesplit and schemarouter parameters can be changed at runtime. In addition to module specific parameters, the following list of common service parameters can be altered at runtime:

  • user
  • passwd
  • enable_root_user
  • max_connections
  • connection_timeout
  • auth_all_servers
  • optimize_wildcard
  • strip_db_esc
  • localhost_match_wildcard_host
  • max_slave_connections
  • max_slave_replication_lag
  • retain_last_statements

Note that alter command effect is immediate and the parameter's value in the runtime will be modified as well as the value in its individual MaxScale configuration file inside /var/lib/maxscale/maxscale.cnf.d/ for persistence across restart.

Add/Remove Servers into Service

After creating a service, we can use the link command to add our servers into the service. Use the server's name as created under Create Servers section:

 maxctrl: link service Round-Robin-Service mariadbgalera1 mariadbgalera2 mariadbgalera3
OK

Similarly, to remove a server from the service, just use "unlink service" command:

 maxctrl: unlink service Round-Robin-Service mariadbgalera3
OK

We can only remove one server from a service at a time, so repeat it for other nodes to delete them. Verify with "list services" or "show services" command.

Listener Management

List Listeners

To list all listeners, we need to know the service name in advanced:

maxctrl: list services
┌──────────────────────┬────────────────┬─────────────┬───────────────────┬────────────────────────────────────────────────┐
│ Service              │ Router         │ Connections │ Total Connections │ Servers                                        │
├──────────────────────┼────────────────┼─────────────┼───────────────────┼────────────────────────────────────────────────┤
│ Read-Write-Service   │ readwritesplit │ 0           │ 0                 │ mariadbgalera1, mariadbgalera2, mariadbgalera3 │
├──────────────────────┼────────────────┼─────────────┼───────────────────┼────────────────────────────────────────────────┤
│ Round-Robin-Service  │ readconnroute  │ 0           │ 0                 │ mariadbgalera1, mariadbgalera2, mariadbgalera3 │
├──────────────────────┼────────────────┼─────────────┼───────────────────┼────────────────────────────────────────────────┤

In the above example, we have two services, Read-Write-Service and Round-Robin-Service. Then, we can list out the listener for that particular service. For Read-Write-Service:

 maxctrl: list listeners Read-Write-Service
┌─────────────────────┬──────┬─────────┬─────────┐
│ Name                │ Port │ Host    │ State   │
├─────────────────────┼──────┼─────────┼─────────┤
│ Read-Write-Listener │ 3306 │ 0.0.0.0 │ Running │
└─────────────────────┴──────┴─────────┴─────────┘

And for Round-Robin-Service:

 maxctrl: list listeners Round-Robin-Service
┌──────────────────────┬──────┬─────────┬─────────┐
│ Name                 │ Port │ Host    │ State   │
├──────────────────────┼──────┼─────────┼─────────┤
│ Round-Robin-Listener │ 3307 │ 0.0.0.0 │ Running │
└──────────────────────┴──────┴─────────┴─────────┘

Unlike other objects in MaxScale, the listener does not have a "show" and "alter" commands since it is a fairly simple object.

Create a Listener

Make sure a service has been created. In this example, taken from the Create Service section above, we will create a listener so MaxScale will listen on port 3307 to process the MariaDB connections in a round-robin fashion:

 maxctrl: create listener Round-Robin-Service Round-Robin-Listener 3307
OK

Delete a Listener

To delete a listener, use the "destroy listener" command with the respective service name and listener name:

 maxctrl: destroy listener Round-Robin-Service Round-Robin-Listener
OK

This concludes this episode of basic MaxScale management tasks for MariaDB Cluster. In the next series, we are going to cover the MaxScale advanced management tasks like service filters, MaxScale user management and so on.


How Load Balancing Works with DBaaS Setups

$
0
0

Database as a Service (DBaaS) takes away the pain of operating a database. So as a user, when you decide to use a DBaas from a cloud service provider, you would only know the database version, size of instance, storage, RAM, and whether the DBaaS supports high availability with multiple instances. You would usually not know about the behind the scenes of the DBaaS - how traffic comes from the application to the database instance, how that traffic is rerouted in case of a failure, how multiple instances are kept in sync to serve traffic, and so on.

In this blog, we will discuss one of the critical parts of a DBaaS, which is Load Balancing.

Load Balance on DBaaS Architecture

Load Balancing plays an important role in a Database as a Service. The load balancer stands in front of the database servers and presents one endpoint to applications. Application side needs only to know one single IP address to connect to the database. On the load balancers,  queries are redirected to the database instances based on the load balancing algorithm, for instance round robin, least connection, or weight-based load balancing.  Load balancers would usually have capabilities to detect non functioning databases, so the load balancer will take out the non functioning nodes from the load balance list.

Some more advanced features include detecting the degradation database performance, shunning servers that for instance are not synced with the latest data, and splitting read/write queries transparently. 

On layer-4 load balancing, the splitting of connections between read and write queries is done using different ports while a layer-7 load balancer should have capabilities to automatically split read traffic from write traffic by inspecting incoming requests. So in a master-slave type setup, writes will only go to the master. 

The Load Balanced Setup on DBaaS

ClusterControl supports building your own private Database as a Service. You can build and deploy a private DBaaS on premise or in the cloud, for instance in an AWS VPC. 

ClusterControl supports a few different load balancing options, including HAProxy, ProxySQL, and Maxscale. We will show you how to deploy load balancing using ProxySQL as a single endpoint for the database. You can go to Manage -> Load Balancer as shown below:

You can select on which node ProxySQL will be installed. If you want to have ProxySQL installed in a dedicated node, just type the IP Address on the list. Select the version of ProxySQL, password for ProxySQL administration and monitoring, and also enable the list of databases to be balanced.  After that, you just need to click the Deploy button.

It is important that not only the database is highly available, but also the load balancer. You need to have at least 2 load balancers running and Virtual IP Address for the load balancer, this will act as a single connection from the application side. Keepalived service manages the Virtual IP Address, and takes care of floating it between two load balancers. ClusterControl also supports deployment of the Keepalived service, you just need to select the load balancer on which it needs to be installed, fill the Virtual IP Address and Network Interface.

There are two roles on Keepalived, one acts as a Master, and the other acts as Backup. It will forward the traffic to the ProxySQL services. On the ProxySQL side, there are hostgroup (re. HG) and query rules concepts to split the read and write query pattern based on the rules as shown in below:

There are 2 hostgroup (HG10 & HG20), HG10 will forward the write queries to the master, and HG20 will forward the read queries to the slave database as shown in the Query Rules below:

From the application side, the database connection only knows the Virtual IP Address (in this case, the IP address is 10.10.10.20). The VIP will move to the backup ProxySQL instance in case of issues with the primary, so the traffic will automatically fail over and applications will still run with minimum impact.

MaxScale Basic Management Using MaxCtrl for MariaDB Cluster - Part Two

$
0
0

In the previous blog post, we have covered 4 basic management components using the MaxCtrl command-line client. In this blog post, we are going to cover the remaining part of the MaxScale components which are commonly used in a MariaDB Cluster:

  • Filter management
  • MaxScale management
  • Logging management

All of the commands in this blog post are based on MaxScale 2.5.3. 

Filter Management

The filter is a module in MaxScale which acts as the processing and routing engine for a MaxScale service. The filtering happens between the client connection to MaxScale and the MaxScale connection to the backend database servers. This path (the client-side of MaxScale out to the actual database servers) can be considered a pipeline, filters can then be placed in that pipeline to monitor, modify, copy or block the content that flows through it.

There are many filters that can be applied to extend the processing capabilities of a MaxScale service, as shown in the following table:

Filter Name

Description

Binlog

Selectively replicates the binary log events to slave servers combined together with a binlogrouter service.

Cache

A simple cache that is capable of caching the result of SELECTs, so that subsequent identical SELECTs are served directly by MaxScale, without the queries being routed to any server.

Consistent Critical Read

Allows consistent critical reads to be done through MaxScale while still allowing scaleout of non-critical reads.

Database Firewall

Blocks queries that match a set of rules. This filter should be viewed as a best-effort solution intended for protecting against accidental misuse rather than malicious attacks.

Hint

Adds routing hints to a service, instructing the router to route a query to a certain type of server.

Insert Stream

Converts bulk inserts into CSV data streams that are consumed by the backend server via the LOAD DATA LOCAL INFILE mechanism

Lua

Calls a set of functions in a Lua script.

Masking

Obfuscates the returned value of a particular column

Maxrows

Restricting the number of rows that a SELECT, a prepared statement, or stored procedure could return to the client application.

Named Server

Routes queries to servers based on regular expression (regex) matches.

Query Log All

Logs query content to a file in CSV format.

Regex

Rewrites query content using regular expression matches and text substitution.

Tee

Make copies of requests from the client and send the copies to another service within MariaDB MaxScale.

Throttle

Replaces and extends on the limit_queries functionality of the Database Firewall filter

Top

Monitors the query performance of the selected SQL statement that passes through the filter.

Transaction Performance Monitoring

Monitors every SQL statement that passes through the filter, grouped as per transaction, for transaction performance analysis.

Every filter has its own ways to configure. Filters are commonly attached to a MaxScale service. For example, a binlog filter can be applied to the binlogrouter service, to only replicate a subset of data onto a slave server which can hugely reduce the disk space for huge tables. Check out the MaxScale filters documentation for the right way to configure the parameters for the corresponding filter.

Create a Filter

Every MaxScale filter has its own way to be configured. In this example, we are going to create a masking filter, to mask our sensitive data for column "card_no" in our table "credit_cards". Masking requires a rule file, written in JSON format. Firstly, create a directory to host our rule files:

$ mkdir /var/lib/maxscale/rules

Then, create a text file:

$ vi /var/lib/maxscale/rules/masking.json

Specify the lines as below:

{
    "rules": [
        {
            "obfuscate": {
                "column": "card_no"
            }
        }
    ]
}

The above simple rules will simply obfuscate the output of column card_no for any tables, to protect the sensitive data to be seen by the MariaDB client.

After the rule file has been created, we can create the filter, using the following command:

maxctrl: create filter Obfuscates-card masking rules=/var/lib/maxscale/rules/masking.json
OK

Note that some filters require different parameters. As for this masking filter, the basic parameter is "rules", where we need to specify the created masking rule file in JSON format.

Attach a Filter to a Service

A filter can only be activated by attaching it to a service. Modifying an existing service using MaxCtrl is only supported by some parameters, and adding a filter is not one of them. We have to add the filter component under MaxScale's service configuration file to basically attach the filter. In this example, we are going to apply the "Obfuscates-card" filter to our existing round-robin service called rr-service.

Go to /var/lib/maxscale/maxscale.cnf.d directory and find rr-service.cnf, open it with a text editor and then add the following line:

filters=Obfuscates-card

A MaxScale restart is required to load the new change:

$ systemctl restart maxscale

To test the filter, we will use a MariaDB client and compare the output by connecting to two different services. Our rw-service is attached to a listener listening on port 3306, without any filters configured. Hence, we should see the unfiltered response from the MaxScale:

$ mysql -ucard_user -p -hmaxscale_host -p3306 -e "SELECT * FROM secure.credit_cards LIMIT 1"
+----+-----------+-----------------+-------------+-----------+---------+
| id | card_type | card_no         | card_expiry | card_name | user_id |
+----+-----------+-----------------+-------------+-----------+---------+
|  1 | VISA      | 425388910909238 | NULL        | BOB SAGAT |       1 |
+----+-----------+-----------------+-------------+-----------+---------+

When connecting to the rr-service listener on port 3307, which configured with our filter, our "card_no" value is obfuscated with a gibberish output:

$ mysql -ucard_user -p -hmaxscale_host -p3307 -e "SELECT * FROM secure.credit_cards LIMIT 1"
+----+-----------+-----------------+-------------+-----------+---------+
| id | card_type | card_no         | card_expiry | card_name | user_id |
+----+-----------+-----------------+-------------+-----------+---------+
|  1 | VISA      | ~W~p[=&^M~5f~~M | NULL        | BOB SAGAT |       1 |
+----+-----------+-----------------+-------------+-----------+---------+

This filtering is performed by MaxScale, following the matching rules inside masking.json that we have created earlier.

List Filters

To list out all created filters, use the "list filters" command:

maxctrl: list filters
┌─────────────────┬────────────┬─────────────┐
│ Filter          │ Service    │ Module      │
├─────────────────┼────────────┼─────────────┤
│ qla             │            │ qlafilter   │
├─────────────────┼────────────┼─────────────┤
│ Obfuscates-card │ rr-service │ masking     │
├─────────────────┼────────────┼─────────────┤
│ fetch           │            │ regexfilter │
└─────────────────┴────────────┴─────────────┘

In the above examples, we have created 3 filters. However, only the Obfuscates-card filter is linked to a service.

To show all services in details:

maxctrl: show filters

Or if you want to show a particular service:

maxctrl: show filter Obfuscates-card
┌────────────┬──────────────────────────────────────────────────────┐
│ Filter     │ Obfuscates-card                                      │
├────────────┼──────────────────────────────────────────────────────┤
│ Module     │ masking                                              │
├────────────┼──────────────────────────────────────────────────────┤
│ Services   │ rr-service                                           │
├────────────┼──────────────────────────────────────────────────────┤
│ Parameters │ {                                                    │
│            │     "check_subqueries": true,                        │
│            │     "check_unions": true,                            │
│            │     "check_user_variables": true,                    │
│            │     "large_payload": "abort",                        │
│            │     "prevent_function_usage": true,                  │
│            │     "require_fully_parsed": true,                    │
│            │     "rules": "/var/lib/maxscale/rules/masking.json", │
│            │     "treat_string_arg_as_field": true,               │
│            │     "warn_type_mismatch": "never"│
│            │ }                                                    │
└────────────┴──────────────────────────────────────────────────────┘

Delete a Filter

In order to delete a filter, one has to unlink from the associated services first. For example, consider the following filters in MaxScale:

 maxctrl: list filters
┌─────────────────┬────────────┬───────────┐
│ Filter          │ Service    │ Module    │
├─────────────────┼────────────┼───────────┤
│ qla             │            │ qlafilter │
├─────────────────┼────────────┼───────────┤
│ Obfuscates-card │ rr-service │ masking   │
└─────────────────┴────────────┴───────────┘

For the qla filter, we can simply use the following command to delete it:

 maxctrl: destroy filter qla
OK

However, for the Obfuscates-card filter, it has to be unlinked with rr-service and unfortunately, this requires a configuration file modification and MaxScale restart. Go to /var/lib/maxscale/maxscale.cnf.d directory and find rr-service.cnf, open it with a text editor and then remove the following line:

filters=Obfuscates-card

You could also remove the "Obfuscates-card" string from the above line and let "filters" line equal to an empty value. Then, save the file and restart MaxScale service to load the changes:

$ systemctl restart maxscale

Only then we can remove the Obfuscates-card filter from MaxScale using the "destroy filter" command:

maxctrl: destroy filter Obfuscates-card
OK

MaxScale Management

List Users

To list all MaxScale users, use the "list users" command:

maxctrl: list users
┌───────┬──────┬────────────┐
│ Name  │ Type │ Privileges │
├───────┼──────┼────────────┤
│ admin │ inet │ admin      │
└───────┴──────┴────────────┘

Create a MaxScale User

By default, a created user is a read-only user:

 maxctrl: create user dev mySecret
OK

To create an administrator user, specify the --type=admin command:

 maxctrl: create user dba mySecret --type=admin
OK

Delete a MaxScale User

To delete a user, simply use the "destroy user" command:

 maxctrl: destroy user dba
OK

The last remaining administrative user cannot be removed. Create a replacement administrative user before attempting to remove the last administrative user.

Show MaxScale Parameters

To show all loaded parameters for the MaxScale instance, use the "show maxscale" command:

maxctrl: show maxscale
┌──────────────┬──────────────────────────────────────────────────────────────────────┐
│ Version      │ 2.5.3                                                                │
├──────────────┼──────────────────────────────────────────────────────────────────────┤
│ Commit       │ de3770579523e8115da79b1696e600cce1087664                             │
├──────────────┼──────────────────────────────────────────────────────────────────────┤
│ Started At   │ Mon, 21 Sep 2020 04:44:49 GMT                                        │
├──────────────┼──────────────────────────────────────────────────────────────────────┤
│ Activated At │ Mon, 21 Sep 2020 04:44:49 GMT                                        │
├──────────────┼──────────────────────────────────────────────────────────────────────┤
│ Uptime       │ 1627                                                                 │
├──────────────┼──────────────────────────────────────────────────────────────────────┤
│ Parameters   │ {                                                                    │
│              │     "admin_auth": true,                                              │
│              │     "admin_enabled": true,                                           │
│              │     "admin_gui": true,                                               │
│              │     "admin_host": "127.0.0.1",                                       │
│              │     "admin_log_auth_failures": true,                                 │
│              │     "admin_pam_readonly_service": null,                              │
│              │     "admin_pam_readwrite_service": null,                             │
│              │     "admin_port": 8989,                                              │
│              │     "admin_secure_gui": true,                                        │
│              │     "admin_ssl_ca_cert": null,                                       │
│              │     "admin_ssl_cert": null,                                          │
│              │     "admin_ssl_key": null,                                           │
│              │     "auth_connect_timeout": 10000,                                   │
│              │     "auth_read_timeout": 10000,                                      │
│              │     "auth_write_timeout": 10000,                                     │
│              │     "cachedir": "/var/cache/maxscale",                               │
│              │     "connector_plugindir": "/usr/lib/x86_64-linux-gnu/mysql/plugin", │
│              │     "datadir": "/var/lib/maxscale",                                  │
│              │     "debug": null,                                                   │
│              │     "dump_last_statements": "never",                                 │
│              │     "execdir": "/usr/bin",                                           │
│              │     "language": "/var/lib/maxscale",                                 │
│              │     "libdir": "/usr/lib/x86_64-linux-gnu/maxscale",                  │
│              │     "load_persisted_configs": true,                                  │
│              │     "local_address": null,                                           │
│              │     "log_debug": false,                                              │
│              │     "log_info": false,                                               │
│              │     "log_notice": false,                                             │
│              │     "log_throttling": {                                              │
│              │         "count": 0,                                                  │
│              │         "suppress": 0,                                               │
│              │         "window": 0                                                  │
│              │     },                                                               │
│              │     "log_warn_super_user": false,                                    │
│              │     "log_warning": false,                                            │
│              │     "logdir": "/var/log/maxscale",                                   │
│              │     "max_auth_errors_until_block": 10,                               │
│              │     "maxlog": true,                                                  │
│              │     "module_configdir": "/etc/maxscale.modules.d",                   │
│              │     "ms_timestamp": true,                                            │
│              │     "passive": false,                                                │
│              │     "persistdir": "/var/lib/maxscale/maxscale.cnf.d",                │
│              │     "piddir": "/var/run/maxscale",                                   │
│              │     "query_classifier": "qc_sqlite",                                 │
│              │     "query_classifier_args": null,                                   │
│              │     "query_classifier_cache_size": 0,                                │
│              │     "query_retries": 1,                                              │
│              │     "query_retry_timeout": 5000,                                     │
│              │     "rebalance_period": 0,                                           │
│              │     "rebalance_threshold": 20,                                       │
│              │     "rebalance_window": 10,                                          │
│              │     "retain_last_statements": 0,                                     │
│              │     "session_trace": 0,                                              │
│              │     "skip_permission_checks": false,                                 │
│              │     "sql_mode": "default",                                           │
│              │     "syslog": true,                                                  │
│              │     "threads": 1,                                                    │
│              │     "users_refresh_interval": 0,                                     │
│              │     "users_refresh_time": 30000,                                     │
│              │     "writeq_high_water": 16777216,                                   │
│              │     "writeq_low_water": 8192                                         │
│              │ }                                                                    │
└──────────────┴──────────────────────────────────────────────────────────────────────┘

Alter MaxScale parameters

  • auth_connect_timeout
  • auth_read_timeout
  • auth_write_timeout
  • admin_auth
  • admin_log_auth_failures
  • passive

The rest of the parameters must be set inside /etc/maxscale.conf, which requires a MaxScale restart to apply the new changes.

MaxScale GUI

MaxGUI is a new browser-based tool for configuring and managing MaxScale, introduced in version 2.5. It's accessible via port 8989 of the MaxScale host on the localhost interface, 127.0.0.1. By default, it is required to set admin_secure_gui=true and configure both the admin_ssl_key and admin_ssl_cert parameters. However, in this blog post, we are going to allow connectivity via the plain HTTP by adding the following line under [maxctrl] directive inside /etc/maxscale.cnf:

admin_secure_gui = false

Restart MaxScale service to load the change:

$ systemctl restart maxscale

Since the GUI is listening on the localhost interface, we can use SSH tunneling to access the GUI from our local workstation:

$ ssh -L 8989:localhost:8989 ubuntu@<Maxscale public IP address>

Then, open a web browser, point the URL to http://127.0.0.1:8989/ and log in. MaxGUI uses the same credentials as maxctrl, thus the default password is "admin" with the password "mariadb". For security purposes, one should create a new admin user with a stronger password specifically for this purpose. Once logged in, you should see the MaxGUI dashboard as below:

Most of the MaxCtrl management commands that we have shown in this blog series can be performed directly from this GUI. If you click on the "Create New" button, you will be presented with the following dialog:

As you can see, all of the important MaxScale components can be managed directly from the GUI, with a nice intuitive clean look, makes things much simpler and more straightforward to manage. For example, associating a filter can be done directly from the UI, without the need to restart the MaxScale service, as shown under "Attach a filter to a service" section in this blog post.

For more information about this new GUI, check out this MaxGUI guide.

Logging Management

Show Logging Parameters

To display the logging parameters, use the "show logging" command:

 maxctrl: show logging
┌────────────────────┬────────────────────────────────┐
│ Current Log File   │ /var/log/maxscale/maxscale.log │
├────────────────────┼────────────────────────────────┤
│ Enabled Log Levels │ alert                          │
│                    │ error                          │
│                    │ warning                        │
│                    │ notice                         │
├────────────────────┼────────────────────────────────┤
│ Parameters         │ {                              │
│                    │    "highprecision": true,     │
│                    │     "log_debug": false,        │
│                    │     "log_info": false,         │
│                    │     "log_notice": true,        │
│                    │     "log_warning": true,       │
│                    │     "maxlog": true,            │
│                    │     "syslog": true,            │
│                    │     "throttling": {            │
│                    │         "count": 10,           │
│                    │         "suppress_ms": 10000,  │
│                    │         "window_ms": 1000      │
│                    │     }                          │
│                    │ }                              │
└────────────────────┴────────────────────────────────┘

Edit Logging Parameters

All of the logging parameters as shown above can be configured via the MaxCtrl command in runtime. For example, we can turn on the log_info by using the "alter logging" command:

maxctrl: alter logging log_info true

Rotate Logs

By default, the MaxScale provides a log rotate configuration file under /etc/logrotate.d/maxscale_logrotate. Based on the log rotation configuration, the log file is rotated monthly and makes use of MaxCtrl's "rotate logs" command. We can force log rotation to happen immediately with the following command:

$ logrotate --force /etc/logrotate.d/maxscale_logrotate

Verify with the following command:

$ ls -al /var/log/maxscale/
total 1544
drwxr-xr-x  2 maxscale maxscale    4096 Sep 21 05:53 ./
drwxrwxr-x 10 root     syslog      4096 Sep 20 06:25 ../
-rw-r--r--  1 maxscale maxscale      75 Sep 21 05:53 maxscale.log
-rw-r--r--  1 maxscale maxscale  253250 Sep 21 05:53 maxscale.log.1
-rw-r--r--  1 maxscale maxscale 1034364 Sep 18 06:25 maxscale.log.2
-rw-r--r--  1 maxscale maxscale  262676 Aug  1 06:25 maxscale.log.3

Conclusion

We have reached the end of the series of MaxScale deployment and management using the MaxCtrl client. Across this blog series, we have used a couple of different latest MaxScale versions (relative to the write-up date) and we have seen many significant improvements in every version. 

Kudos to the MariaDB MaxScale team for their hard work in making MaxScale one of the best database load balancer tools in the market.


Migrating from Maxscale to the ProxySQL Load Balancer

$
0
0

A database load balancer, or proxy, is a middleware service between application layer and database layer. Application connects to the database proxy, and the proxy forwards the connection to the database. There are some benefits using a database proxy, for example: split read and write queries, cache queries, distribute queries based on some routing algorithm, queries rewrite, and scale your read-only workload. A database proxy also abstracts the database topology (and any changes) for the application layer, so applications only need to connect to one single endpoint.

There are various database proxies out there, from commercial to open source options e.g., HAProxy, Nginx, ProxySQL, Maxscale, etc.  In this blog, we will discuss how to migrate database proxies from Maxscale to ProxySQL with the help of ClusterControl.

Current Architecture with Maxscale

Consider a highly available database architecture which consists of 3 nodes in a Galera Cluster, and on top of it, 2 Maxscale and Keepalived services for high availability of the database proxy. Galera Cluster is “virtually” synchronous replications, it uses a certification based for replication ensuring your data will be available on all the nodes. The current architecture is shown below:

Maxscale is a database proxy from MariaDB Corporation, which acts as middleware between applications and databases. 

Here’s the topology architecture for Galera Cluster and Maxscale load balancers in ClusterControl. You are able to deploy all this directly from ClusterControl, or import existing databases and proxy nodes into ClusterControl. You can see your database topology in the Topology Tab.

Deploy ProxySQL & Keepalived

ProxySQL is another database proxy from ProxySQL, which provides some features such as query caching, queries rewrites, queries split for write and read based on queries pattern. To deploy ProxySQL in ClusterControl, you need to go to Manage -> Load Balancers in your cluster. ClusterControl supports a few different database proxies; HAProxy, ProxySQL, MaxScale.

Choose ProxySQL, and it will show the below page:


We need to choose the server address where ProxySQL will be installed. We can either install on the existing nodes or if you want to have a dedicated node for ProxySQL, just type the IP address in the list. Fill the password for Administration and Monitoring users, Add the application user into ProxySQL or you can configure later. Enable the database servers to be included in the load balancing set in ProxySQL. Click the Deploy ProxySQL button. We need to have at least 2 ProxySQL for high availability.

If we forget to add a database user into ProxySQL during the setup, we can configure it in the ProxySQL user tab as shown below:

ProxySQL requires database users to be configured in ProxySQL as well.

After ProxySQL is deployed, we continue to configure the Keepalived on each ProxySQL host. Keepalived services will act as master/backup roles across the ProxySQL instances. Keepalived service uses VIP (Virtual IP Address), so application will connect to a virtual IP Address on master role, and will forward the connection to the local ProxySQL. If the services fail, the VIP automatically be floated to another node.

Deploying keepalived in ClusterControl is done on the same page as the database proxy, you just need to choose the Keepalived tab. Choose the load balancers type, which is ProxySQL, and then add the current ProxySQL for Keepalived1 and Keepalived2. Fill the Virtual IP Address and Network interface. And finally, click the Deploy Keepalived button.

Running two ProxySQL with Keepalived services gives us a high availability proxy layer. In ClusterControl, it is shown in the below topology view:

Switchover

Switchover of the traffic is really straight forward, just need to change the ip address connection in the application layer to use Virtual IP Address for ProxySQL, and then monitor the traffic through ProxySQL.


What is MariaDB Enterprise and How to Manage it with ClusterControl?

$
0
0

Have you ever wondered what products MariaDB Enterprise has to offer? Is it different from MariaDB Community? Can I manage them with ClusterControl?

MariaDB provides two distributions of their software — Enterprise and Community. The Community consists of the MariaDB Server, which has Galera embedded; you can use either standard, asynchronous or semi-synchronous replication or, as an alternative, build a MariaDB Cluster based on Galera. Another addition to the Community distribution is MariaDB ColumnStore. MariaDB 10.6 Community comes with ColumnStore 5.5. MariaDB ColumnStore is a columnar analytics database that allows users to create fast reporting queries through a reporting-optimized way of storing the data. Finally, it is also possible to use MaxScale, a proxy developed by MariaDB, for free as long as you use up to two database nodes. This limit, however, means it’s not feasible for any production deployment and might be used as a never-ending trial.

This post will explore products included with MariaDB Enterprise and how it works with ClusterControl.

What Products does the MariaDB Enterprise Platform Include?

MariaDB Enterprise Server

Let’s take a look at the Enterprise offering from MariaDB. MariaDB 10.6 is the enhanced version of the Community version. It comes with features such as an improved MariaDB Enterprise Audit plugin that adds additional options to control the audited events. MariaDB Enterprise Backup is an improved version of MariaBackup, which reduces the optimized lock handling, effectively decreasing the blocking of writers if a backup is running. MariaDB Enterprise Cluster adds additional data-at-rest encryption for Galera, non-blocking DDLs for Galera, and a few other small features.

MariaDB Enterprise ColumnStore

A further difference is in other parts of the package. First, ColumnStore is available in the most recent version — 5.6 or 6.2. MariaDB Enterprise ColumnStore 6, as per MariaDB documentation, comes with new features like disk-based aggregation, which allows you to trade the performance of the aggregation operations for larger data sets that can be aggregated. So far, all data had to fit in memory. Now, it is possible to use disk for aggregation. Another improvement is introducing an LZ4 compression in addition to the already existing Snappy compression. The precision of the DECIMAL data type has also been increased from 18 to 38, and it’s now possible to update transactional data from ColumnStore data. We can execute updates on the InnoDB table that uses data from the ColumnStore table. In the past, only the other way around (updating ColumnStore based on InnoDB data) was supported.

Finally, another significant change between Enterprise and Community ColumnStore offerings is that MariaDB Enterprise ColumnStore comes with an option to deploy multi-node setups, allowing for better scalability and high availability.

MariaDB Xpand

MariaDB Xpand (previously Clustrix) is a database that, while still providing drop-in compatibility with MySQL, allows users to scale out by adding additional nodes to the cluster. MariaDB Xpand is ACID-compliant and provides fault tolerance, high availability, and scalability. On top of that, other features listed on the MariaDB website are parallel query evaluation and execution, columnar indexes, and automated data partitioning.

MaxScale

As we mentioned earlier, MaxScale, even though it is available to download for free, comes with a license that limits its free use to only two backend nodes, making it unusable for most production environments. In the Enterprise offering, MaxScale does not have such limitations, making it a feasible solution for building deployments based on different elements of MariaDB Enterprise. MaxScale supports all of the software included in the MariaDB Enterprise and acts as a core building block for any of the supported topologies. MaxScale can monitor the underlying databases, route the traffic among them, and perform automated actions like failovers should the need arise. This makes it a great solution for controlling the database traffic and dealing with potential issues. Much older versions of MaxScale have been released for the public, but, realistically speaking, the recent version is what’s most interesting feature-wise, thus making MariaDB Enterprise one of the ways to use MaxScale.

How does MariaDB Enterprise work with ClusterControl?

ClusterControl itself does not provide access to MariaDB Enterprise repositories, nor does it allow users to get the MariaDB licenses. However, it can very easily be configured to work with MariaDB Enterprise. As usual, ClusterControl requires SSH connectivity to be in place:

Then we have another step where we can pick the MariaDB version and pass the password for the superuser in MySQL.

ClusterControl, by default, is configured to set up community repositories for MariaDB, but it is possible to pick an option to “Do Not Setup Vendor Repositories”. It is up to the user to configure repositories to use MariaDB Enterprise packages, but once this is done, ClusterControl can be told just to install the packages and not care where they come from. This is an excellent way of installing custom, non-community packages. Just make sure that you picked the correct version of the MariaDB that you have configured the Enterprise repositories for.

Alternatively, especially if you already have MariaDB Enterprise deployed in your environment, you can import those nodes into ClusterControl, given that the SSH connectivity is in place:

This allows ClusterControl to work with existing deployments of MariaDB Enterprise.

Such deployment of MariaDB, no matter if imported or deployed, is fully supported by ClusterControl, both asynchronous replication, and MariaDB Galera Cluster. Should your cluster switch to a non-primary state, backup schedules can be created and executed, failover will happen, replicas will be promoted as necessary, MariaDB cluster nodes will restart, and the whole cluster will be bootstrapped.

As for other elements of the MariaDB Enterprise, ClusterControl supports MaxScale load balancer. The same pattern we explained for the MariaDB database can also be applied here. If you deployed the cluster using existing repositories, MaxScale would be installed as long as it can be downloaded from one of the configured repositories.

Alternatively, it is possible to import the existing MaxScale instance:

This, again, allows you to import your existing environment into ClusterControl.

When imported, ClusterControl provides an interface for MaxScale’s command-line interface:

You can execute different commands directly from the graphical interface of ClusterControl.

As you can see, no matter if you are using MariaDB Community or MariaDB Enterprise, ClusterControl can help you to manage the database and MaxScale load balancer. 

Wrapping Up

Many elect to use MariaDB Enterprise for its advanced features to achieve ACID compliance, high availability, load balancing, security, scalability, and improved backups. Whether you’re using MariaDB Community or MariaDB Enterprise, ClusterControl can help you manage the database and the MaxScale load balancer. If you want to see it all in the works, you can evaluate ClusterControl free for 30 days.

If you go the route of MariaDB Enterprise and want to take advantage of load balancing, check out how to install and configure MaxScale, both manually and with the help of ClusterControl.

Stay in touch for more updates and best practices for managing your open-source-based databases, be sure to follow us on Twitter and LinkedIn, and subscribe to our newsletter.